Showing posts with label paint. Show all posts

Monday, May 27, 2019

A cup of thanks...


Hey,

Happy Memorial Day to you!!

It is a holiday here in the US and in the UK - whoop!

Today I am sharing a couple of cards I made a few weeks ago using Studio Katia 'A Cup of Thanks' stamps and dies.

This is a pretty new stamp set for me, I have only coloured it before now, I hadn't actually made anything using it.

I needed to make x2 cards - birthday and thinking of you. And I thought the flower-filled cup would suit both needs and suited the people that they are going to.

The thinking of you card, I die-cut the white panel first and then added splashes of yellow watercolour paint to create a fun background that coordinated with the colours in the stamp.

For the happy birthday card, I went with a spotty background paper, a touch busy, but I think it really makes the cup pop.

Both cups were coloured with Copics and Nuvo Aqua flow shimmer pens.

This stamp set ended up being way more versatile than I had expected, I'm looking forward to making more with it.

Cx


Wednesday, July 4, 2018

Rollerskating Dinosaur....


Hey,

I found this fun challenge Moo-Mania.

The original idea was to make small size projects. They have recently expanded that to accept any size project.

I liked the current theme - Use your favourite colours..

I decided to create a background using my newest acrylic paints in some of my fave colours.. I love pinks, blues and purples - I often add green for interest, but to be frank, if I am using colour then I rarely work with other colours (excluding neutrals).

So I created the background using stripes and splashes of paint in my 3 mainstay colours and added a splash of green, as it was looking a bit dark! I added some gold sparkly dots here and there and some purple stenciled letters.

The background seemed a perfect fit for a Rollerskating, headphone wearing T-Rex!

I stamped part of the sentiment (from the same set as the T-Rex) in purple ink directly onto the background and the rest of it I stamped in the same purple ink as my T-Rex onto white card and mounted onto the card.

I like it's grungy feel, it was a fun card to make.

Cx

Saturday, July 22, 2017

Same, same but different...


Hey,

Hubby and I had a lot of fun last night, celebrating his birthday at Ravel. We'll be going back there again.

Good friends of ours have twin Sons.

I thought it would be great to repurpose the Dino card for one of them and make another similar one to compliment it.

Like being twins?!

I created the background panel slightly differently, I used a stencil and a white distress paint resist, instead of a Gelli Plate.

I thought the 'same' element would be the layout and the balloons. I used a Your Next Stamp Monster instead of a Dinosaur for this card.

I love it when I can repurpose an early make and it was fun to semi-recreate the original card.

Cx


Wednesday, May 31, 2017

Circle Gelli Plate..


Hey,

So about a bejillion weeks ago I bought a circle Gelli plate.

I liked the idea of having a circle one and since I bought it, I have made quite a few fun things with it.

Today's cards were my first attempt with it and I decided to go with a black base and layer colour on top.

I think it worked out really well.

The blue card was made using a stamp by MFT and white ink, I die-cut the circle out using the largest circle die I have and then I added the die-cut sentiment using staples. The sentiment dies are both by Tim Holtz.

The purple card I made using a Craft Scraps stencil and 3 different colours of paint, green, blue and purple. I was actually surprised at how much it stands out against the black. Result! The sentiment was made using a Winnie and Walter birthday die and a Tim Holtz die.

I love playing with Gelli plates now I have mastered a technique that works for me - you can read more about that here.

Cx


Wednesday, March 22, 2017

Mini Canvases....


Hey,

Recently I started working out of an actual office (not my craftdesk) with two colleagues.

It's nice, but I miss being at home..

I thought on the first day that we were all together it would be nice to give them a gift, but as I don't Nicole that well, I didn't want to be too personal.

So I settled for 'initial canvases'.

I started with Blick 2x4 canvases and added texture paste to them through different Tim Holtz mini stencils.


Once the paste was dry, I chose 3 colours of acrylic paint and roughly painted over the paste - roughly because I wanted some of the white to show through.


Pretty right? That white 'palette' is a laminated piece of scrap paper, I have these in all different sizes and use them for ink, paint, messy mediums and when they wear out I just recycle them.

Final step once the paint dried was to add the initials, I had originally planned to spell out our names, but I thought just an initial was more impactful. I have these ancient black sparkly Thickers that worked really well here. I affixed them with Glossy Accents, because of the paste I wanted to be sure they held.

I love working with small canvases, it's a little slice of art.

My colleagues loved them BTW.

Cx


Thursday, March 16, 2017

Gelli Plate Backgrounds...


Hey,

A couple of weeks ago, one of my art crushes Kim Dellow showed a great way to use your Gelli Plate on Instagram.

I had to try it out that day and I am so pleased I did.

I have been using the Gelli Plates with varying degrees of success, but I think now with this simple technique I will be getting much better backgrounds.

All you have to do is cover the Gelli Plate in a colour using a brayer, then stamp that onto paper (I chose to use watercolour paper). Then clean the plate and put a stencil over it and then add paint over that using a brayer. Remove the stencil and stamp over your solid colour - voila! amazing backgrounds.

Here are mine -

 Aren't they pretty?

From left to right clockwise, the stencils are by Dutchdoobado, Tim Holtz, Dina Wakely, Dutchdoobado and Recollections.

I have only made cards using 3 of them so far, the main photo is my fave, it makes me laugh.
I thought that background looked a bit Jungle, so it needed a Dinosaur (The Alley Way Stamps, sadly no longer in business) and I added balloons that are a mix of dies and punches. I coloured the balloons using distress stains and the Dino using distress inks. The sentiment is by Simon Says Stamp.

The next two cards use roughly the same idea, giant die-cut sentiment, finished with a stamped sentiment.
Wplus9 happy die, Neat & Tangled birthday stamp
Winnie & Walter birthday die, Neat & Tangled happy stamp
I'm pleased with the colour combos here and JT helped me choose the yellow for the scalloped background as I couldn't decide.

Cx

Friday, November 4, 2016

Good or Evil?


Hey,

Happy Friday.

I thought I'd show you a fun little make that I made for a friend.

When the craftgang got together Lisette gave us a load of spare stamped sentiments and the wooden mermaids, so I grabbed one of my fave mini square canvases (super handy for making random stuff) and painted it gold using a Dina Wakely paint that Cheiron gave me for my birthday.

I cut up the sentiment and attached it to the canvas using Glossy Accents, same with the Mermaid.

Super easy and hilarious. I have no doubt the friend who it is going to will love the sassy nature of it.

Have a great weekend, I am off to lunch with Lisette tomorrow and playing at my desk and watching non-stop NFL - YAY!!

Cx


Thursday, October 20, 2016

Experimenting...


Hey,

Is anyone else glad that the week is nearly over?!

I realised I hadn't shared what I have been up to in my art journal in a while..

This week, I am experimenting with stamping and mixing watercolours and acrylics.

Normally, I paint the background for my spread in acrylic paint before I do anything else..

This week I have been stamping first, essentially creating a scene of sorts and then watercolouring the stamped images.

Once this is dry, I have added acrylic paint around 'the scene'.

I am very pleased with the results.

Here is last night's one -


All the stamps are by - Unity Stamp Co, 7Gypsies, Dear Lizzy, Clearly Besotted and Art Foamies..

Fun times!

I am enjoying this experiment a lot.

Cx

Wednesday, September 28, 2016

Happy Birthday to Jade...and me...


Hey,

So today is my birthday and I share it with a very good friend Jade who lives in Australia..

Jade is in the midst of home renovations, so I will be sending her a gift later in the year.

Today I thought I'd share something that is NOT a card...

It's pretty similar to something I'd make for Jade :)

Michael's had a big canvas sale a while back and I really liked the newsprint ones, so I bought a few of them in various sizes.

This one I kept simple, I added a stripe of glittery paint and pink paint, let that dry and then added some texture paste through a heart stencil.

The wooden 'Happy' is also from Michael's and I painted it black, so it would stand out.

I affixed the word to the canvas using Glossy Accents..so very versatile.

I love how it came out, a fun little gift for a friend (not Jade..)

I'm off to dinner at my fave Greek tonight, with my Dad and some of my friends - fun times.

Thank you to everyone for your lovely cards and presents, I felt very loved and spoiled this morning.

Cx

Wednesday, July 13, 2016

Papercrafters Corner..Magazine Challenge #152...

Hey,

Recently whilst I was bumbling around blogs I stumbled across Papercrafters Corner - a great resource and they have an awesome challenge.

They give you a magazine cover as inspiration, you can pull out any of the elements for your project.

Here is the magazine cover for the current challenge #152 -


I love it and immediately thought it would make an awesome art journal spread.

So many of the elements inspired my spread..some are obvious, vintage lady, car, birds, map. I also used the colours from the background and the car to inspire my colour backdrop.

The grid in the car inspired me to stencil a grid here and there.

The map was the basis for my 16 scalloped rectangles, which if you look closely are the US states ;)

Just below the lady in the inspiration image there is a small piece of text, so I added some random text to my spread, you can also see subtle references to 1921 throughout my spread.

Finally I used the signpost as the main inspiration for my spread, I used the New York reference throughout and interpreted the signpost as arrows - all over.

This was such a fun spread to create, I can't wait for next week's inspiration cover.

Cx

Thursday, July 7, 2016

Playing in my Art Journal..


Hey,

So my Ma arrived last night - yay!!

I suspect that tonight she will want to break out her new art journal and have a play..so I thought I would show you some things that have been going on in mine lately.

The main photo is a spread I created based around a photo of a painting from a book I found in my $1 bin bookstore dive.. The book is called America in Print. I chose to use this painting by William Russell Birch because a) it is the view from Long Island across the East River looking at Manhattan and it's possibly, roughly where I live now on Manhattan and b) William Birch was English..

I used a Dina Wakely elephant paint for my background and used lime paint for my central highlight. I wanted to make the spread be an extension of the painting and I wanted to get the artists name it. I am really pleased with it and it is a fun mix of stamps and stencils.

One of the best things about art journaling is stretching my stamps and stencils and making them work a bit harder for me. 

The next spread was born out of my desire to create a pink spread LOL, seriously..I felt my pink paints have been a bit neglected recently.


Before the paint dried, I quickly used two stencils and removed some of the paint through them using baby wipes..love this technique and you get such awesome results.

Obviously I opted for Flamingoes, they are pink after all. I die-cut them using glossy paper and dripped alcohol ink onto them to create the fun colours on the right ones. The left ones I inked through the negative die-cuts.

I anchored the Flamingoes using tissue paper and washi tape. For a final touch I added some glitter paste through a stencil here and there..

This spread makes me so happy, so soothing..I think it's the pinks..

I love this art journal thing, I like the lack of rules, playing with paint, collaging things in, just the general random nature of it all.

Cx


Wednesday, July 6, 2016

WOYWW #370..Momma arrives..


Hey,

Happy WOYWW!

Time for the weekly global desk nosy, currently hosted by the lovely Lunch Lady Jan at her blog. Whilst our leader Julia recovers from her op.

I'm all wiggly with excitement today as my Momma arrives for 2 weeks tonight - yay.

My desk photo was taken just as I was finishing work yesterday, so my work keyboard, mouse and desktop (on the computer) are visible. I was getting stuff ready for colouring for Kathy Rac's 30 day colouring challenge and I got out some stamps for the art journal spread I'm working on.

Here is the finished card from yesterdays 30 day colouring..


I love this stamp, it is by Stamping Bella and it reminds me a bit of me lounging in the sun LOL.

Some of you asked me to show you last week's art journal spread in progress finished, so here it is, along with a close-up shot -


I am not 100% certain that it is finished, but it's done for now..

Have a great day, I will be checking out desks after Yoga before Ma arrives.

Cx


Monday, July 4, 2016

Happy 4th of July..


Hey,

Happy Independence Day everyone!

I had a play in my journal in honour of today.

I am really enjoying this art journal thing..its weird and fun.

Today's spread was easy to make.

I started by stenciling the words onto the pages, that helped me figure out how to build out the rest of the flag.

As I applied the paint and the tissue paper for the stripes, I covered over the words slightly, but they were visible enough for me to position the cut-out letters / numbers.

The stars were punched out of a dictionary page, that I found in last weekends $1 bin bookstore rummage. These were actually very fiddly to apply to the page..I like to use a regular glue stick to stick things to the page (easy to remove if I change my mind) and then go over them with a Matte Medium Gel (I use Liquitex).

I'm really pleased with how it came out and it was fun, because I hadn't planned on tissue paper for the stripes, I was going to use white paint, but it was a bit flat and I realised I had all these strips of tissue paper that were exactly the right size for stripes!

Here is a close-up, so you can see the stars and the tissue paper -


The tissue paper was from my fave random bookstore chain in London and was a totally random buy that I seem to be using everywhere!

Have a great day..back to work tomorrow kittens - boo..

Cx

Friday, June 10, 2016

Simon Says..Summer Garden..


Hey,

Happy Friday to you..

I am leaving on a jetplane for London later on today, but first I wanted to join in the Simon Says Stamp Monday Challenge - Summer Garden.

I liked the theme and thought it would make for a good play in my art journal.

The phrase 'Summer Garden' makes me think of my Ma's garden.

I love my Ma's garden it's a peaceful happy space and is full of flowers, shrubs, birds, animals (Squirrels, Foxes, Hedgehogs, our Cats), butterflies and is basically a reflection of my Ma's happy generous personality.

I miss Ma's garden a lot. My Dad is not a garden person and is baffled by the amount of time we spend out there!

I started my spread with five colours, yellow, peach, orange, lime green and pale blue. I layered them onto my journal and kept layering and blending until I had something I was happy with.

I used my new fave trick of a baby wipe through a stencil to add some interest to the pages.

I recently bought a Hollyhock die by Impression Obsession, because it reminded me of Ma's garden, so seemed appropriate to use here. I collaged them in, along with the big blue birdie (Ma gets lots of birds in her garden - Swifts, Sparrows, Robins, Starlings, Magpies, etc) and stamped a few flowers here and there.

I used a fave Clear Scraps stencil to create a 'sun'. I also used a Tim Holtz tracks stencil in random places on the pages.

Finally I added 'Summer is best in my Momma's Garden' because it is and I'll be in it tomorrow, drinking tea, eating cake and gossiping.

Have a great weekend.

Cx

Wednesday, June 8, 2016

WOYWW #366..Learning and Laughing...


Hey,

Happy WOYWW to you!!

It is that time of the week when we pop over to join our leader Julia at her blog Stamping Ground for the global desk nosy.
She is still recovering from her op, so Lunch Lady Jan is still hosting us and doing a marvelous job.

My desk is a teeny bit dull after the excitement of the last 2 weeks.. Just my computer, my sippy cup, glasses, die pokey tool and a little pile of paper, cards and dies at the front of my desk. This little pile is something I am working on for a swap with Scrapbook Lynne...a fellow desker..

On Sunday I went to a great class taught by the one and only Dina Wakely (swoon), she is my new crush, she is awesome, hilarious and a great teacher.

Class was fun, as I sat with Cheiron, Jamey and Lisette (an unexpected surprise). I love these ladies, they make me laugh (out loud and a lot!), make me a bit braver in class and are just all round fun..needless to say margaritas and Mexican food followed...

Below is a little collage of my pages from class (and a pic of Moi and Dina)...


Here are a couple of pics of my finished pages, so you can see them in their entirety. We cut windows, so you could see each spread and Dina taught us a whole load of techniques, some of which were new to me..Like rubbing off paint using a baby wipe through a stencil - and my mind was blown!!

Warm spread, using 3 warm paint colours (pinks, oranges, purples)

Cold spread, using 3 cold paint colours (blues, greens, greys)
I'm off to London on Friday for a week, so no WOYWW for me next week - I schedule my posts when I am in London, it's easier that way.

See you all later for a nosy.

Cx

Wednesday, June 1, 2016

WOYWW #365.. So many reasons to be happy...


Hey,

Happy WOYWW..

As you know our fabulous leader Julia is in hospital recovering from her op, so the also fabulous Lunch Lady Jan has stepped in again so that What's On Your Workstation Weds can continue..

I had great fun catching up with many people during the Seventh anniversary last week. I didn't make ATC's, but several very sweet people sent me ones anyway..I will be send you something else in the post ladies and thank you - WOYWW spirit just making me smile as always.

So what's on my desk? Well it looks pretty similar to last week right? My art journal front and centre, waterpot (full of dirty water), tea towel for cleaning brushes and various partly made items strewn around my desk..

My journal was actually supposed to be two individual pages and not a spread..but actually turned out looking like a spread, I think it's because of the colours..


As per the title of my post today, I have a lot of things to be happy about - I just spent a really nice weekend with Hubby, chilling out in the Sun together, holding hands, drinking, eating, giving up smoking and hanging out with old friends. 
My Dad is actually coming to visit us ON HIS OWN in NYC in Sept (he has not been on a foreign vacay for 30 years!!). These things all make me happy and realise how lucky I am. If you get a chance today just smile at yourself..it makes everything better :)

A few people wanted to see the Pocket Letter I had made for Nikki C. Now that I know she has it, it can be revealed!


I used a co-ordinating paper stack to cut the inserts and all the little icons are wooden and hand painted by me! I chose symbols for my two Cities - London and NYC and wrote a little story about what each one means to me on the back of the insert. There are also little tiny gifts behind the inserts too :)

I'm swapping things with a few other people, so just message me if you are up for a swap :)

Have a great day.

Cx

Wednesday, May 25, 2016

WOYWW #364..Seventh Anniversary...


Hey,

Happy WOYWW, it is the Seventh Anniversary of WOYWW today and ATC swap day.

Our illustrious leader Julia is away this week and so Lunch Lady Jan or LLJ is the hostess with the mostess, over at her blog Lunch lady Jan's Fabric Frenzy.

I am not joining in the ATC swap this year, I just didn't have the time this year with my large project at work.

I think Cara will be happy with my desk this week, she's always telling me it's too tidy.. I signed up for a Dina Wakely art journal class run by The Inkpad NYC and so I wanted to have a little play before the class. On my desk you can see my art journal front and centre, my paint pallet, waterpots and brushes, my coffee from the local deli, a piece of scrap grid paper for stamping on and various other bits and bobs.

Because I work from home from my craft desk, my enthusiasm for staying at my desk to make cards is not there. I felt I needed something more unstructured, but I am SO linear that it can't be too random..

So I thought painting would be good and then I was turned onto the idea of Art Journaling by Cheiron.

I am loving what I am creating and it's such a fun, messy way to spend 30 mins immediately after work, then my mojo returns and I spend another hour or so playing at my desk before Hubby comes home.

Here's the spread you can see on my desk..not sure if it's finished or not, but that's the fun part of art journals, you can come back to a page if you want to.


Because I like structure in some shape or form, I traced around oval dies to create the egg like shapes. I then die cut tissue paper in the two sizes and stamped over it. Before collaging the stamped ovals onto the page, I broke out the water colours and painted around the egg shapes. 

The stamped tissue pieces got applied using Liquitex Multi Matt Medium, as did the butterflies.

I then used a Faber Castell Pitt Big brush pen in black and white to draw around all the shapes and add some interest to the blue watercoloured eggs..

I love bling..so...

Here's a close up, so you can see the details.


Fun times right? Best bit is..because of all the different techniques I love to try, I have only had to buy a journal..I have everything else in my craft room.

Happy Seventh Anniversary everyone, especially big shout out to Julia, you are awesome and WOYWW gives me so much every week, even if I don't join in.

Cx

Sunday, May 22, 2016

Wooden Letters..


Hey,

Happy Sunday!

I had a fun playdate with Cheiron yesterday. I am MOST envious of her amazing craft room..one day..

I'll show the makes from yesterday tomorrow.

Oh and I saw that I got the Rockstar over at Retro Sketches for my Magic card for RS #213 - Yay!!

Today I wanted to show you a fun card that I CASEd - but here is the rub, I can't find the card anywhere..If you recognise your card when you see mine, please reach out so I can show you some love and credit you.

The card had a giant letter U on it..So I bought a wood U from Michael's and painted it with Navy acrylic paint.

Because I wanted the U to be the focus, I kept the colors simple and the rest of the sentiment was as minimal as it could be,

I am getting lots of mileage already out of the happy die that JT bought me :)

I love this, I need to make some more of them, they really work for 'man' birthday's.

Cx


Thursday, February 19, 2015

Erasers put to work..


Hey,

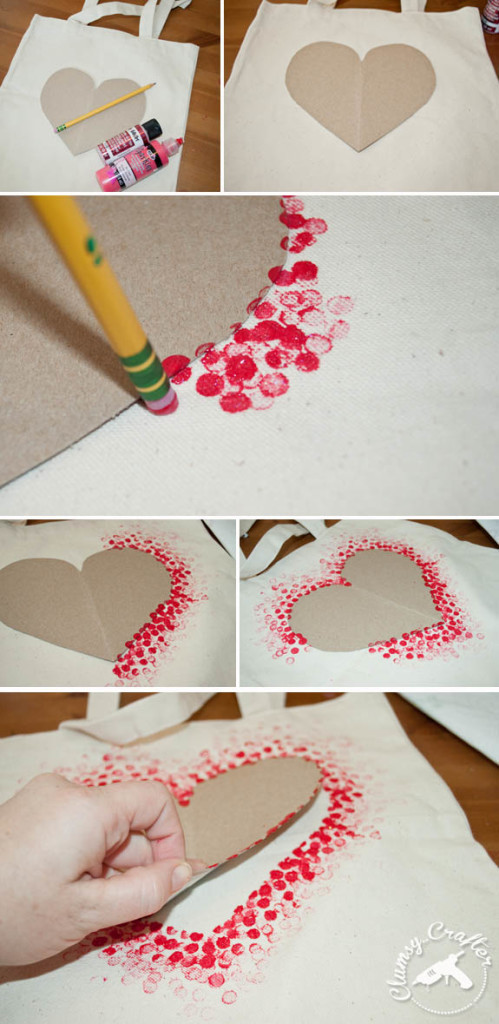
For a while now I have been eyeing this great pin and tutorial on one of my Pinterest boards -


I figured I could make this work as cards..

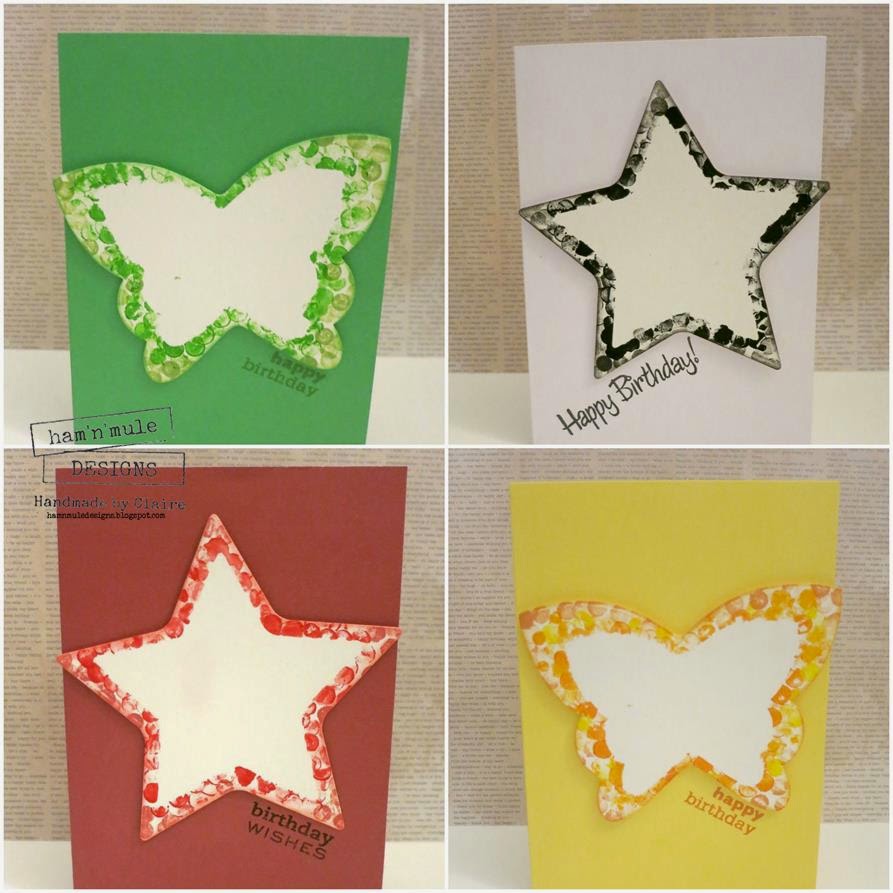
I die cut a star, a heart and a butterfly - all from nesting dies - this is important for later on. Don't use the biggest die. I rooted around and found some un-used pencils and acrylic paints.

I then used removable glue to stick the die cut shapes to Canson Mixed Media paper.

As my paints are seriously old and dry, I spritzed the eraser with water and dragged it across the hard paint!

Then I dabbed over the edges of the die cut, I did this until the paint ran out and then got a bit more paint and repeated this tons of times. Then taking the next size up die, I cut around the eraser dabbed shape.

Once you have the finished die cut, you might need to add some more eraser dabs. To tidy it up and fill in some of the white space, I inked around the edges of the die cut.

I mounted the shapes onto contrasting card blanks and added a sentiment.

Fun way to spend an afternoon..here are the rest of the cards.


Cx

Monday, November 24, 2014

Pinterest Idea - brought to life....


Hey,

So a few months ago I saw a pinterest idea that I wanted to try as a Christmas gift.


You make a calendar that fits a 4x6 photo frame. The idea is to decorate the calendar any way you want.

I decided to use digital stamps for all the months, add some text and hand colour them.

I am super pleased with the outcome.

WIN!! Its the first big Pinterest project I have tackled and it was really easy - but time consuming - because not only did I have to make and colour the calendar, but I added the acetate to the window and painted the frame from natural wood to white!!

Here is another photo -


I put all of the months in the back of the frame. Made it all neat and tidy for wrapping.

Cx