Showing posts with label gifts. Show all posts

Tuesday, July 14, 2026

Retro Rubber Challenge #276 - Let's get sketchy...

Hey,

Welcome to another fun Retro Rubber challenge.

We have a sketch for you this time.


You know how much I love a sketch! 

I had a completely different idea in mind. But remembered I had these cool Taylored Expressions Freebie 2024 postage stamps. Lisette gave them to me as a Christmas gift in 2024. I chose 3 from the 12 stamps that I thought went well together and would make a great birthday card.

It was super easy to make, I coloured the stamps using Altenew markers. The sentiment is one of many ancient ones that live on their own clear blocks on my desk, because I use them over and over. I have no idea who it's by, but it is at least 10 years old!

Such a cute card!

Show us your interpretation of the sketch, pop over to Retro Rubber, and get inspired by the things the DT have made.

Challenge ends July 24th.

Don't forget to tell us the age of your stamp, that is part of the fun of our challenge, and please only enter 5 challenges including Retro Rubber.

Cx

Friday, April 16, 2021

A surprise gift...


Hey, 

Happy Friday!

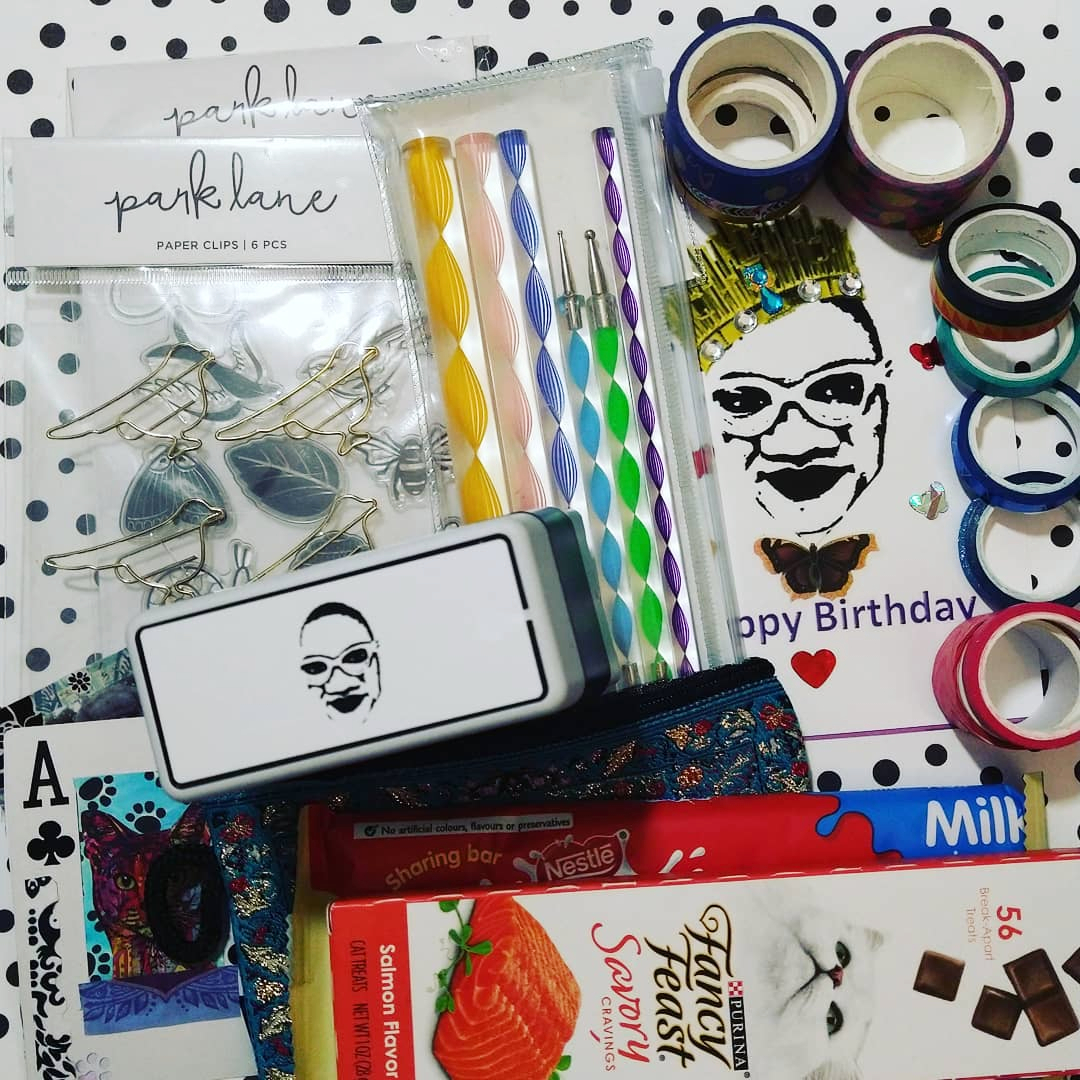
So over Easter weekend I got a surprise parcel from my Aunt in Texas.. I was literally blown away by it.

I suspect that she doesn't have a lot to spare, so that made it even sweeter. But it was also super thoughtful. I mean I am the vainest person I know, so a stamp of my face = YAASSSS. But not only that, there were gift cards, stamps, planner clips, tape, a little purse and gifts for 'my 2 legged and 4 legged nephews' hahaha.

All 3 of us were very happy with the parcel and it made our weekend.

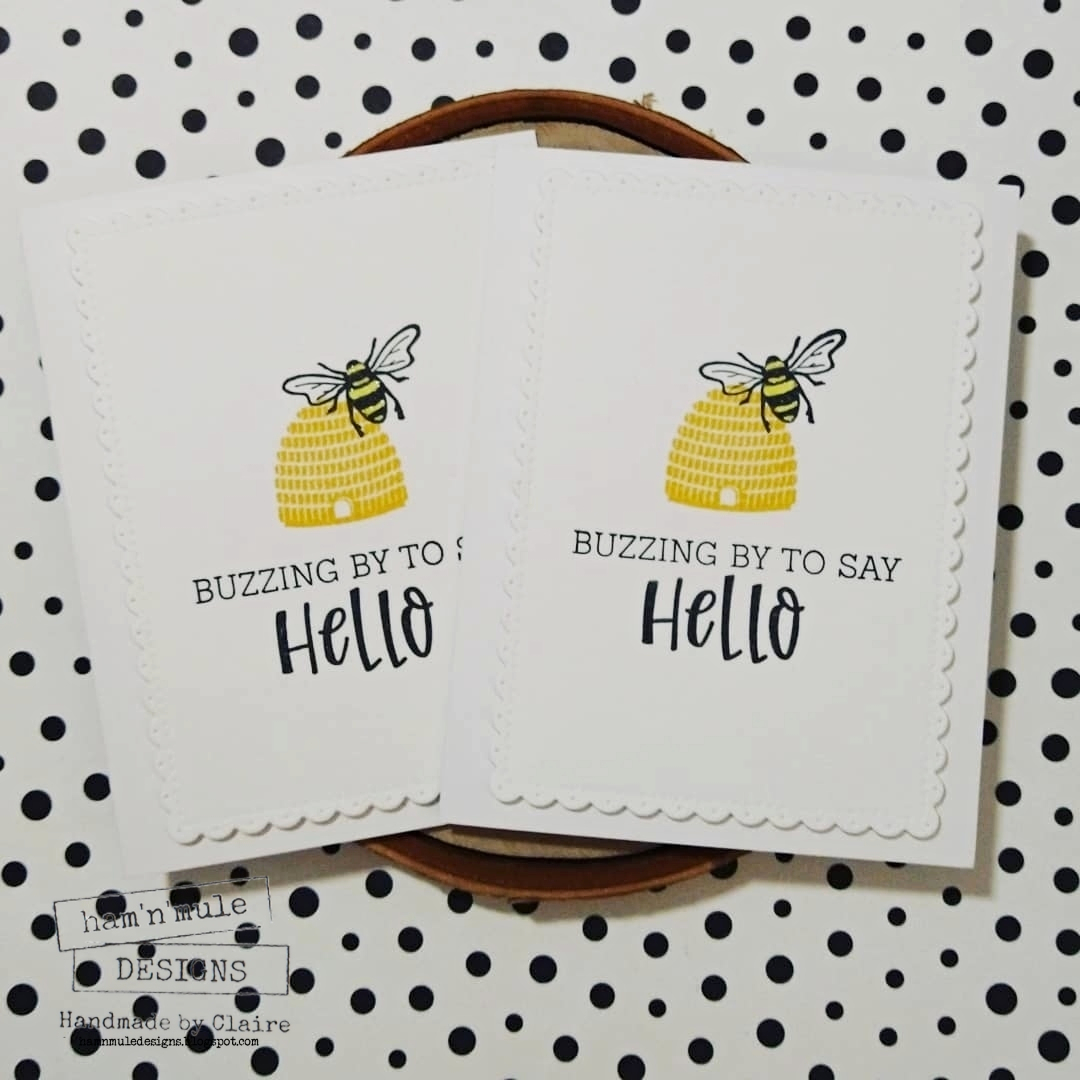
Obviously I had to break out one of the stamp sets and make some cards. I decided to pay it forward and use the lovely gift to make some cards for charity - I added the 'Buzzing by to say' sentiment by Honey Bee stamps. I believe the stamp set is called 'Nature Icons' and is from Joanns.


Cute right? I love how they came out and that fancy die really finished the card for me.

Have a great weekend, I will be watching the Gran Prix at Imola on Sunday.

Cx


Monday, October 26, 2020

Fancy Cocktail Cards...


Hey, 

Happy Monday.

Hope you had a great weekend?

Mine was exercise/sport fuelled - my new spin bike arrived last week, so I could use it all weekend and I did and it was great. Also, standard NFL Sunday in my house (10hrs of solid football) and it was a Grand Prix weekend, so Clint Catwood and I were up early to watch Lewis Hamilton make history.

I love Tim Holtz blueprint stamps and quite a while ago, we used the great Cocktail blueprints in a class with Cheiron. I am notoriously mean when it comes to buying things brand new and full price.. So I have never owned these, until a few weeks ago when I found them on super-bargain sale - whoop!

The fact is, I have SO many crafty goodies that I made a pact with myself to curb my spending there can only be sale goodies coming in UNLESS the thing is a limited edition (like the Tim Holtz SSS Stamptember cats!).

Anyway, I decided to put the new stamps to good use and make a set of cards for a friend as a gift. I thought they would look amazing heat embossed over fun backgrounds. And as I always have backgrounds on hand, I pulled out x4 that I thought suited the stamps. 

From top left and clockwise here are the techniques used for the backgrounds - distress oxide smooshing, stencil lift (I used the stencil with distress ink for another background, when done, spray the side of the stencil that is facing you, with water and then lay down on a piece of paper), gloss spray through a stencil, distress oxide smooshing.

Fun right! My friend loved them and I have made another set since. I can see a default, easy gift coming on here.

Cx 

Saturday, March 24, 2018

Sketch Saturday #506..Paper Nest Dolls ....


Hey,

Happy Saturday to you and welcome to the latest sketch for the Sketch Saturday challenge.

Our sponsor this week is Paper Nest Dolls and they are offering 3 digital stamps from their shop.

Here's the sketch...
When I saw the Party Chicks stamp I thought it would work really well with the sketch.

I chose my background paper first, so that I could colour the image to match. I love the soft tones I ended up with and I added some Nuvo crystal drops here and there for a bit of sparkle.

The sentiment is by CAS-ual Friday stamps..I love their stamps and I thought it would be nice to stamp it in colour and not black.

I outlined the 2 white panels using a Copic BG10 marker - it's the only Copic marker I have because it is super handy and there really isn't a Promarker equivalent.

I can't wait to see what you do with the sketch, but first check out what the rest of the DT have made over at Sketch Saturday.

Challenge ends 30th March 7pm GMT / 2pm EST
Cx


Monday, November 20, 2017

Christmas Wrapping: Tags...


Hey,

Happy Monday, hope you had a great weekend, Hubby and I had awesome fun with the Nixons.

I have a few Christmas gifts that need to leave now-ish, as they are going to faraway climes.

As we all know I LOVE tags - shop bought, handmade, I don't care, I just love tags.

So the starting point of any gift for me is the tag.

I had to make these very quickly, so I cheated and used ready cut manilla tags, smooshed them in some Distress Oxide ink and then stamped the cute sentiment by Unity Stamp Co and the Reindeer by Clearly Besotted.

I like to just colour bits of the image, it adds a bit of interest to the tags. I did this last year, but made the entire tag (smooshed background + tag die).

Fun and easy to make and will look pretty on the gifts.

I'll show you the wrapped gifts later in the week.

Cx

Wednesday, September 13, 2017

Mini Monster Thanks...


Hey,

So I think I have mentioned before my love of Monster stamps and dies...

I am fortunate enough to have amazing friends that randomly send me Monster stamps and dies in the post. Honestly..without asking, I get home and there are these amazing things waiting for me. So lucky.

When I got home this weekend, there was a little package from Cheiron, it had this amazing card in it..


And pineapple socks, a crafty keyring, a Tim Holtz Splatter tool and these awesome Monster dies..
Silly Monsters by Tim Holtz and Sizzix
How awesome is that!

So I had to make her a card using one of the dies to say thanks. I decided to go for bright colours, as Cheiron tends to work with these kinds of colours. I die-cut the sentiment (by Tim Holtz) and affixed it to my Monster, then for a bit of a laugh I added some googly eyes!

I love it, can't wait to play with the rest of the dies.

Cx

Wednesday, March 22, 2017

Mini Canvases....


Hey,

Recently I started working out of an actual office (not my craftdesk) with two colleagues.

It's nice, but I miss being at home..

I thought on the first day that we were all together it would be nice to give them a gift, but as I don't Nicole that well, I didn't want to be too personal.

So I settled for 'initial canvases'.

I started with Blick 2x4 canvases and added texture paste to them through different Tim Holtz mini stencils.


Once the paste was dry, I chose 3 colours of acrylic paint and roughly painted over the paste - roughly because I wanted some of the white to show through.


Pretty right? That white 'palette' is a laminated piece of scrap paper, I have these in all different sizes and use them for ink, paint, messy mediums and when they wear out I just recycle them.

Final step once the paint dried was to add the initials, I had originally planned to spell out our names, but I thought just an initial was more impactful. I have these ancient black sparkly Thickers that worked really well here. I affixed them with Glossy Accents, because of the paste I wanted to be sure they held.

I love working with small canvases, it's a little slice of art.

My colleagues loved them BTW.

Cx


Monday, January 23, 2017

Gotta love a freebie..


Hey,

I am a bit slow to the party today ;) Momma has gone home and Hubby is WFH to keep an eye on me!

After I post this, I will be going out on my daily 15min walk..

Last week JT sent me an English craft magazine that came with this great stamp set - 


I had to have a play pretty much immediately!!

I kept the cards simple - a) because that is all I could manage and b) I think the sentiments shine on their own.

I die-cut MFT Stitched Scalloped Circle frames in white and blue. I stamped the sentiment onto the white circle (the scalloped white piece goes in with the dies for use another time..)

I framed the sentiments with the blue pieces and decided they looked better popped up on foam dots.


They felt a bit plain, so I added some Nuvo drops to the white circles around the sentiments, I love Nuvo Glitter drops...I am totally overusing them!!

Love it when a gift triggers fun times at my desk.

Cx

Friday, October 28, 2016

I Heart Seattle..


Hey,

Happy Friday.

So Seattle will always be a special place for me for a million reasons.

One of those reasons is my amazing friend Michelley. Her and her family have been a part of my life for 25 years and it's hard to imagine a time without them.

She now lives in Hawaii, but I get my Seattle fix from her big brother.

This card is actually for him, because he said he wanted some of the Unicorn Christmas Cards, so I wanted to send him a batch.

I can't post something without adding a card and I thought a Seattle focused one would be fun.

The stamp set is Kelly Purkey for Hero Arts and I also have the NYC version.

Another super simple make, with minimal colour. I stamped the pike place sign first and masked it off, so I could stamp the mountains.

The I Heart stamp is actually from the NYC set and I masked off the NYC part. I fussy cut the coffee cup and the space needle so I could add some dimension to the card.

Very pleased with this fun little make..

Have a great weekend, Hubby and I are off to visit JT's parents, a weekend of gambling, eating, drinking and laughter is just what we all need in our lives.

Cx


Monday, September 5, 2016

Paste Congrats...


Hey,

Happy Labor Day!

I am in Mexico with Hubby this week, so my posts are scheduled.

I like holiday post time, because I get to show you things that have been languishing on my camera for a while LOL.

Today's card hasn't been hanging around too long.

I need a congratulations card for a colleague and I wanted to make something a bit different for her.

I used my new fave Dutch Doobadoo Fan stencil with some texture paste and once it was dry, I die-cut it to size using a stitched rectangle die.

The little border dies were cut using random scraps of paper and they are new because when I was last heading home JT asked me if I needed anything as she was doing a Craft Superstore order..I didn't 'need' anything but these awesome dies were on sale... She kindly bought them for me as a gift, but she was a bit ambivalent about them..

I really like them and thought the 3 I chose to use here worked really well, I secured them to the paste panel using mini staples.

I thought I had a couple of congrats dies to choose from, turns out I totally do not, I only have the one you see, which is nice, but was not what was in my head (cue purchase of new die). This one is part of a Simon Says Stamp set that I love  (don't think they sell it anymore), but I was thinking of a chunkier die here.

Anyway, I love the end result, leaving the paste as it is makes everything else pop and the random mix of colours and patterns in the border dies is fun.

Cx


Thursday, March 17, 2016

Get well in warp speed...

Hey,

So today I am showing you a little package that I made for a friend's Niece who was recently hit by a car!!

Liz and I have been friends for twenty years and she lives in New Zealand, so snail mail is our friend.

I thought it would be nice to send her Niece care package as well as a get-well card. 

The card used my new Paper Smooches 'Space Cadet' stamps..I have wanted them forever and they are awesome. The stitched speech bubble die is new too, by Spellbinders..on sale $2 for 3 dies - had to be purchased.

I am loving the new square kraft card blanks, you will be seeing a lot of square cards LOL!

Here is a photo of the final package -


It is prettily wrapped in a Hema window envelope (Hema is in Amsterdam and I AM OBSESSED), inside it contains, one of my handmade notepads, a pencil and x4 mini cards.

Here's a photo of the notepad (sorry rough Instagram photo), essentially, I cover the mini notepads I get in sets of 8 from the dollar store and add loops / string for closing. Simples.


Final photo for today of the mini cards - love these, need to make more of the 'Hey' cards. The stamps are a mix of Avery Elle, Lawn Fawn, Simon Says Stamp and Recollections by Michaels.


A nice simple care package for a girl who needs a smile.

Cx

Thursday, December 17, 2015

Mini Canvas Christmas Gifts..


Hi,

I wanted to make my 2 bosses a handmade gift.

For 2 reasons - 1) its nice to give handmade stuff 2) they do not understand crafting, they think JT and I are insane...

I guess no.2 has some truth :)

I decided to make them a mini canvas each.

I used the tissue paper and water technique that I showed earlier in the year.

It's fun to do.

The image top right is what the canvas looks like when you add the tissue and the water. The image bottom left is what was left once the tissue is dry and you remove it.

I wasn't overly happy with the final colours, so I used some distress paints and a stencil to create the overlay you can see.

The sentiment is by CASual Fridays, it's a firm fave of mine.

I hope that they like them.

Cx

Friday, December 11, 2015

Personalised Notebook...


Hi,

Happy Friday..

This is a scheduled post, as today my whole firm and our significant others are on our way to Lisbon for our Christmas Party.

As I am going to be with my work colleagues this weekend, I thought I'd show you the notebook that I gave one of my work colleagues last month for her birthday.

I have a big stash of these Muji blank kraft notebooks - I like this size (A5/A7) best. I use them for emergency gifts.

Erika loves butterflies..so this was a pretty easy one to make. I used my fab letter stamps for her name and an Inkadinkadoo butterfly stamp. Voila! Personalised notebook.

Easy peasy gift, but makes the recipient very happy...every time.

Have a fun weekend, I know we are going to!

Cx

Friday, September 11, 2015

One die 3 cards...


Hey,

Happy Friday.

Well it is nearly time for Hubby and I to return from our Mexican paradise.

Today I wanted to show you some thank you cards that I made as part of a gift for a friend.

I used a fave thanks die by Lawn Fawn, I thought it would be fun to use this die to make 3 different cards.

The main card used a simple masking technique, I cut the thanks twice and adhered one of them (with removable adhesive) to my card and stamped the doilies all around it. I then carefully peeled it off and replaced it with the red version - cool right?

This card uses a very simple technique using distress inks and water. I inked up the Stampin' Up Watercolour Stripes stamp using 4 different distress inks, then I lay my paper on to the stamp. Once it transferred to the paper, I die cut it and then spritzed it with water before heating it to dry it.


The final card is a shaker - I couldn't resist. Super simple. love my shaker mix here - it uses some great Martha Stewart sequins from a Simon Says Stamp cardkit. The paper is by Stampin' Up.


As I said at the beginning of this rather long post..these cards were part of a gift for a friend. Below is a photo of the rather fetching little parcel I put together.


Cx

Monday, November 24, 2014

Pinterest Idea - brought to life....


Hey,

So a few months ago I saw a pinterest idea that I wanted to try as a Christmas gift.


You make a calendar that fits a 4x6 photo frame. The idea is to decorate the calendar any way you want.

I decided to use digital stamps for all the months, add some text and hand colour them.

I am super pleased with the outcome.

WIN!! Its the first big Pinterest project I have tackled and it was really easy - but time consuming - because not only did I have to make and colour the calendar, but I added the acetate to the window and painted the frame from natural wood to white!!

Here is another photo -


I put all of the months in the back of the frame. Made it all neat and tidy for wrapping.

Cx

Monday, December 17, 2012

All wrapped up


I have been a very efficient bunny!

I have bought all of the Christmas presents and wrapped them all. They all look very beautiful thanks to Panduro Hobby.

I saw an idea on their site (shown below) and thought with a bit of modifying it would be really nice and easy for Christmas. I liked it because you could mix and match your papers and ribbons and even though I like a bit of uniformity in my wrapping I get bored every year when I choose a theme and then have to stick with it.


The main photo today is of a little stack of presents for various people, I think they look gorgeous and I have started distributing some of the gifts already and everyone has said how much they love the wrapping. Which is nice and makes the effort worth while.

So what did I use...

Plain brown paper - available everywhere
Block colour and patterned bright wrapping paper - from Hema in Amsterdam
Various patterned ribbons - from Ikea
Gift tags - handmade by me, using x3 Woodware punches - super dupa circle, scalloped circle and snowflake.

I tackled the extensive wrapping task in x3 phases..
Phase 1 - wrap everything in brown paper, write the recipients name in pencil on the paper (in a spot where it will be covered)
Phase 2 - add the brightly coloured paper and 1st stage of ribbon
Phase 3 - make gift-tags to co-ordinate with the coloured paper and add to gift, finish the ribbon tying

Sounds like a lot of work, but honestly it was easy peasy. Here are a few more photos.

Close-up on Ma's tag...present it a bit Carrot shaped!

I tried a different technique with the ribbon here

Close-up of the tags and you can see all the beautiful ribbon in detail
Now that JT and I are post HamnMule Christmas and craft fairs, I have been enjoying all these little projects and I've taken loads of photos of what I have been up to so should have a few more posts before Christmas. One of my favourite projects was making my Christmas Thank You's - as you know I love a Thank You set and I think this years ones are the best yet!

Cx


Thursday, November 29, 2012

Gift or Sell?


This is a common dilemma with me. HamnMule is a teeny tiny little business now, but it started as my hobby and still remains a hobby. I have to remind myself that sometimes..

I have been making some random things recently and I think the move to NYC and the possibility that thrifty, crafty me might have to flex some muscle (as we won't have much money) is pushing me to try new things.

Today's main photo is one of the calendar cards I made. Last year I made all different versions of these as my Christmas'Thank You' cards and as small gifts. This year I wanted to make them a bit more uniform, but struggled with a good idea of how to do it it well.

There were lots of offcuts from my new clear stamp filing system (which I should blog about) and so I had a play and the result is this lovely blue flowered calendar card. The blue backing paper is one of the offcuts, the flowery paper was free and I've always been a bit worried about how best to use it. You can buy the calendar tabs anywhere. Dead easy to make and they look lovely on desks. I think they are much better than last years versions, so I now want to give some as gifts...

To distract myself from my 'gift or sell dilemma', I decided to have a little play with my new bunting die's by Xcut - they are amazing and really easy to use in the Epic Six.

Here is a photo of the bunting I made, using the dies and the Stampin' Up Pennant punch -


I also made 'Birthday' in matching colours. I've packaged them for sale with green outdoor twine in a cellophane bag with instructions. Sounds like a great idea right? Well, the trouble is they are so pretty, I want to give them to friends with kids and then go to parties and see the bunting up!

Basically I know I am going to end up selling half of the calendar cards and paper bunting and giving half as gifts.

I guess that is the point of having a 'crafty' style hobby :)

Only 2 days until the final Craft Fair of the year for JT and I - we are off to Berkhamsted Town Hall on Sat 1st December, if you want to come and visit us!

Cx

p.s apologies for my photo quality, I've had to take my photos at night recently!

Monday, November 26, 2012

Stocking Fillers


So JT and I have been talking and blogging about things we can make for the craft fair that would make nice inexpensive Christmas Gifts. JT has already written about hers and I showed you some of my ideas for card sets which I made during my inspiration session.

Basically following the rules of the inspiration session, I wanted to try new ideas and use new things. This post is about the other card sets I made. I was so spurred on by trying out new things, that I went a bit card set crazy...there are a few other things I made too, but I'll post about those later in the week.

Today's main photo is of one of my favourite sets. Once again I used papers from the DCWV All About Girls mini stack. I've been wondering how to use the cherries paper and this worked well. The paper flower and button, feel like a nice touch (and UHU and I didn't fall out).

Here are a few more examples -


1, 4, 7 & 8 are all made using the foam hearts from Amsterdam, the giant heart punch and the scallop punch. I like the mix of hearts.

2 is a bit fun I think and is a good way of using my DCWV Hippie Chick 8x8 papers. I like the contrast of colours.

3 & 5 also use the DCWV Hippie Chick papers, but I added a contrasting candi for fun. I don't usually stamp in orange, but it really worked here.

Then I put them in cellophane bags and tie them up with twine, which gives them that 'gift edge' -


Sorry the photo isn't the greatest, it was taken at night! It does show you a bit more detail of the hearts and cherries sets.

I'm really pleased with these and busy conjuring up sets for us to give as gifts. What fun!

Cx

Tuesday, June 19, 2012

Making to give..part 1


I love making things that are going to be given to friends / family as gifts, it means I take extra special care, use my favourite things and dig out parts of my stash that I have been saving as 'special' - why do we crafter's do that? I guess it's a bit like saving shoes for 'best'?

As well as trying out new things this weekend, I also started making some things to give to friends / family - for no particular reason. I am just hooking up with lots of people I haven't seen in a while and I like to give gifts, even more than I like receiving them. Also the bonus of handmaking stuff for people is no matter how much they hate it, they don't have the heart to tell you :)

First up is today's main picture, which is of a set of 6 cards, that I made for my friend Lucy (not my Sister-in-Law). She quite likes earthy tones and so I wanted to make something for her that reflected that. When I was re-arranging the craft room, I stumbled upon a box of embellishments that I had bought about 5 years ago when I started crafting! I love them, but they have always been difficult to work with.

I decided that what the embellishments needed was a bit of a fussy background which I felt would tone them down a bit. I used my Martha Stewart punch around the page loopy border set and some over elaborate V&A papers and I think the results are simple but impressive. Below are a few more photos for you.


Tomorrow, I'll be posting part 2 of my making to give activities - using an old favourite - the Martha Stewart Crab punch - yay!

Cx