Showing posts with label die cutting. Show all posts

Tuesday, February 28, 2023

Retro Rubber Blog Challenge #201 - Tic Tac Toe..


Hey,

Welcome to another fun Retro Rubber challenge.

We have a tic tac toe board for you this time!


I love these boards, even if we choose the same row, our cards are all so different!

I chose the top horizontal line - die-cut or punch, ribbon or twine and slimline.

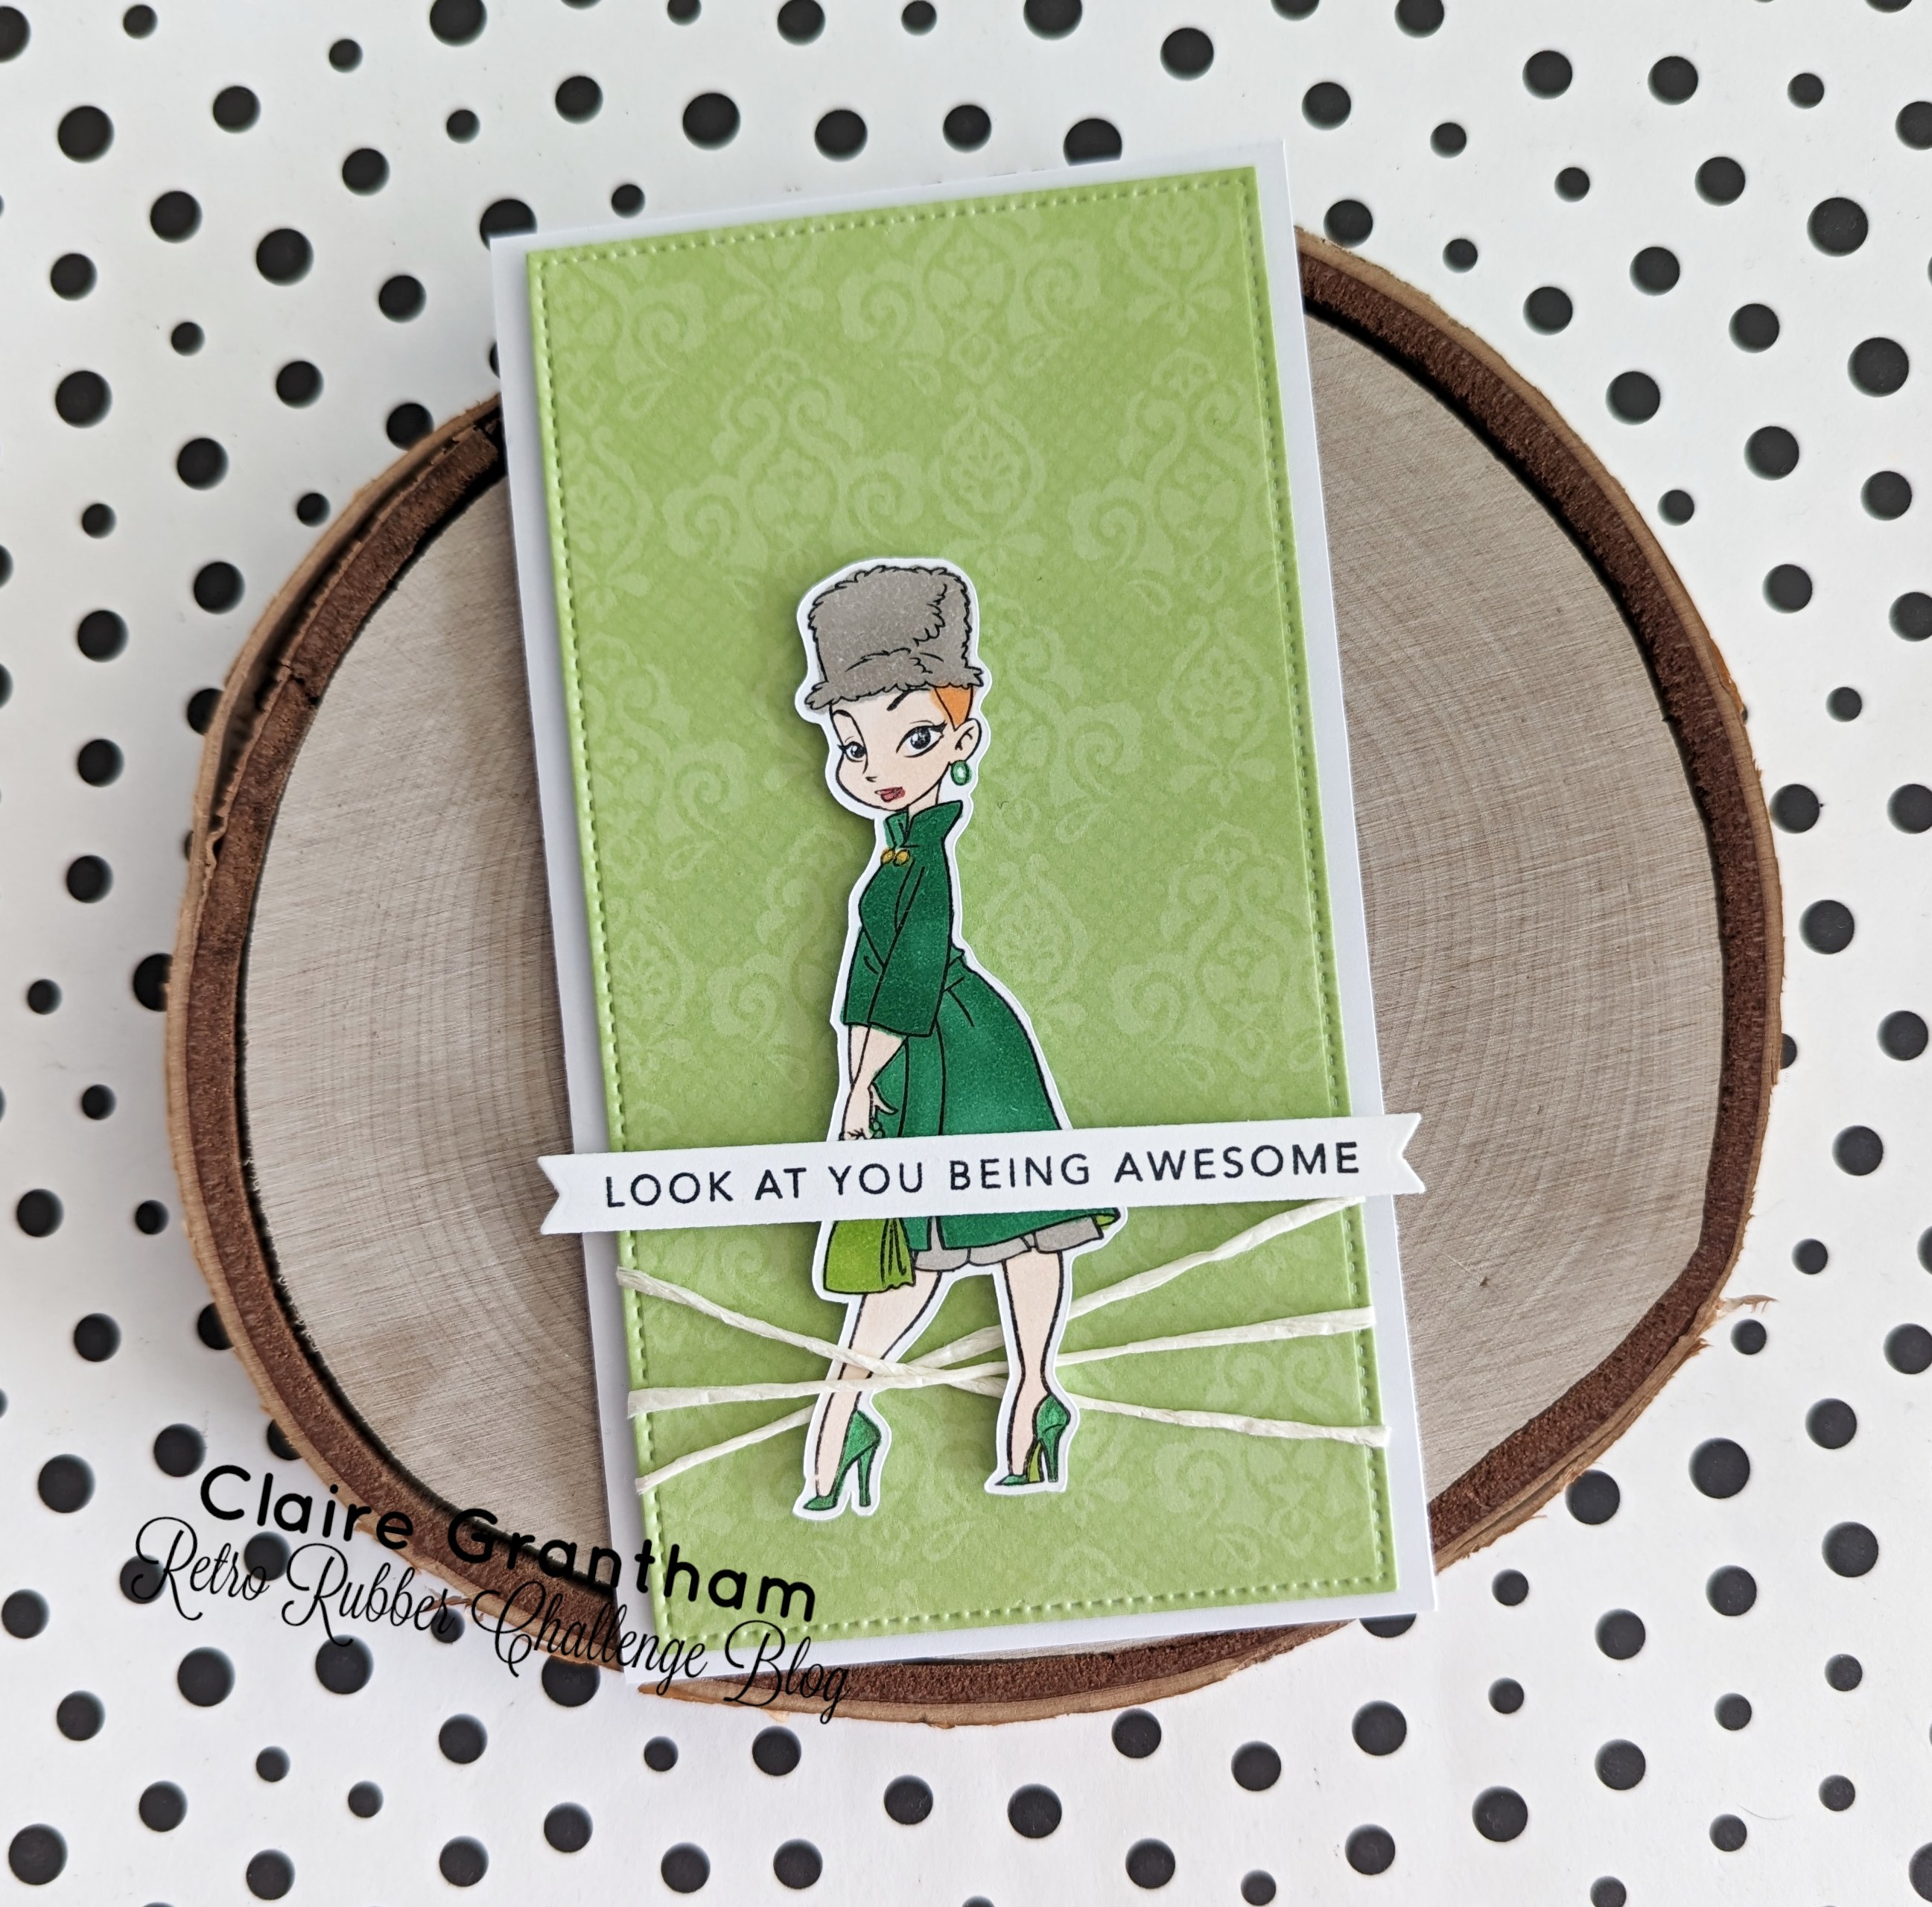
I am a big fan of the mini-slim format, so that was easy. I used a Paper Play mini-slimline rectangle die to cut my background paper. The paper twine is SO old I am thinking nearly 10 years old, it came in a huge bundle and I use it a lot, but it never seems to run out. The gorgeous lady stamp was a birthday gift last year - C.C Designs 'Fashionista' and I coloured her using Altenew Markers and cut her using my Brother Scan n Cut. The sentiment is from 2021 and by Taylored Expressions 'Simple Strips Friendship' I love these strips, they give you so many fun sentiments to use.

Which row will you choose? Pop over to Retro Rubber and get inspired by the things the DT have made.

Challenge ends March 10th.

Don't forget to tell us the age of your stamp, that is part of the fun of our challenge and please only enter 10 challenges including Retro Rubber.

Cx

Thursday, October 28, 2021

Fusion Card Challenge - Pink Typewriter...


Hey,

Welcome to another fabulous Fusion Card Challenge.

This time we have 'Pink Typewriter' for you! As always both the sketch and the inspiration image are awesome.


Which will you try?

Weirdly for me, no fusing this time, the typewriter inspired me so much, I didn't use the sketch!

I love these sets from Lawn Fawn - Just My Type and Love Poems. They make super cute little scenes and I thought it would be fun to make a little scene for this challenge.

I stamped everything onto watercolour paper and watercoloured everything - easier I find when you have lots of bits and pieces! I constructed the 'room' by sticking all my papers together to get the right division for the wallpaper, skirting board and floor and then I die-cut it all out as one piece.

It's SO cute, I love it and it is accompanying a gift for a friend.

Make sure you check out all the rest of the inspiration by the DT over at the Fusion challenge blog, and play along with your own creation! When playing along you may use the sketch OR the photo to inspire your makes. OR, if you are feeling adventurous, you can fuse them together (see what I did there!).

Can't wait to see your makes. 

Challenge ends on November 9th.

Cx

Saturday, April 20, 2019

Sketch Saturday #560.. Sparkle and Sprinkle..


Hey,

Happy Saturday to you and welcome to the latest sketch for the Sketch Saturday challenge.

Our sponsor this week is Sparkle and Sprinkle and they are offering a prize of a $15 gift certificate to their store

Here's the sketch...


I thought the Aster Garden stamp was gorgeous and would work really well with the sketch.

Sadly, due to the light in my house at the time of taking the photo, you can't see the true colour of the beautiful rose gold shimmery paper that I used for the main strip!

I am super pleased with my colouring of the Aster, I opted for peachy pink. I added 3 strips of shimmery silver paper to match the sketch and instead of a bow or an embellishment, I added the die-cut sentiment to the bottom left of the image, that was also die-cut out of shimmery paper. A LOT of shimmer on this card!

I can't wait to see what you do with the sketch, but first check out what the rest of the DT have made over at Sketch Saturday.

Challenge ends [April 26th 7pm GMT / 2pm EST

Cx

Wednesday, March 13, 2019

Spring has sprung...


Hey,

Happy Wednesday!

Today I thought I would show you some NBUS!

I loved this Impression Obsession Sunflower die - one of my Retro Rubber colleagues used it a while back and I fell in love and bought it.

It has languished in my NBUS bin for a few months now and I finally broke it out..

It die-cuts like a dream and used a wonderful piece of ancient gold / yellow DCWV shimmer cardstock. I blended a bit of green distress ink directly onto the card blank and then I affixed the Sunflower die-cut over it.

Because I wanted to frame it, I pulled out a MFT stitched scalloped rectangle frame die and die-cut that in yellow and affixed it over the Sunflower.

The happy birthday banner I bought in a pack on super bargain sale. I know I can stamp these things, but sometimes I like pre-made banners.

I love this springy card, it made me super happy.

Cx


Tuesday, March 5, 2019

The Paper Players: Happy Spring!...


Hey,

I thought it would be fun to try and enter a few challenges before I head to London on 22nd of March, as I won't have a full kit there, so it won't be possible.

Today I am entering the latest The Paper Players challenge -


Last year when my Momma came for a visit, she brought all the freebies from a couple of craft magazines that I had subscribed to. It was basically x2 years of goodies from x2 magazines = 24 freebie packs - YAY.

I was going to use a new stamp for this challenge, but then I remembered the big batch of goodies from Momma had a fun Spring scene in it.


I had great fun, playing with this little set. I die-cut the 'scene' die in white and then coloured the flowers and leaves. I die-cut it again in brown, so I could cut out the tree trunks, as I didn't really want to colour those in.

I die-cut the Fox, Rabbit and Butterflies and I added some details to the fox, as his face didn't really show up that well.

I used the scalloped circle mat die that came with the set, but added a smaller circle die of my own to create a frame.

To put my card together, I die-cut a piece of blue paper using a circle die and affixed that to my card blank, then I added the Fox, Rabbit and Butterflies to that.

I popped up the panel with the scene on it, so that I got some dimension. Foolishly I didn't add the sentiment before popping it up - ugh.

It's so out of my comfort zone, but I loved making it - really fun to make almost an entire card without any stamping and I have a recipient in mind.

Cx

Monday, August 7, 2017

Happy 30th Birthday..


Hey,

Happy Monday.

I wanted to make a fun card for JT's sister to celebrate her turning 30.

I made the card when JT and I were having our playdate a week ago.

The cover plate I used is new-ish and is by Avery Elle. I stamped a piece of white card using a Hero Arts tiny heart background stamp before I die-cut it.

I am loving the new Papertry Ink number dies that I got from Cheiron, they are proving to be most handy.

I also needed a gift card holder, so I pulled out my Silhouette to see what I had in my library and I came across this fun Pineapple gift card template.


Isn't it fun? It was super easy to put together and adds a touch of fun to a boring old gift card.

Hubby is back tonight..FINALLY and I am very excited to see him - sad that it's only for 3 days, as I leave for London on Thursday.

Cx

Saturday, April 22, 2017

Sketch Saturday #460...Relaxing...


Hey, 

So it's time for another great Sketch Saturday...

Our sponsor this week is Digital Stamp Boutique and they are offering a £10 gift certificate for their store.

Here is the sketch.

I really liked the Alyssa relaxing stamp and felt like a perfect fit for the sketch.

I decided to go with a muted lilac / purple colour palette and that informed all my paper / colouring choices. I embossed the deep purple background using a Sizzix spot folder, the floral strip is from my scrap box and by Pink Petticoat.

I printed Alyssa a couple of times in different sizes, as I wasn't sure which dies I wanted to use. I settled for ancient Spellbinders Labels 4 dies and die-cut the two panels.

My final touches were the fun sentiment by Hero Arts, some stickles and a blingy purple heart.

This has already left my desk and is on its way to a friend.

What will you do with the sketch? Check out what the rest of the DT have made over at Sketch Saturday.

Challenge ends 28 April 7pm GMT / 2pm EST

Cx

Saturday, January 21, 2017

CASology: Cut


Hey,

So I am doing pretty good following my operation. I am able to move around and do normal stuff.  A bit stiff and no lifting, housework etc, but all good.

It has been lovely having my Ma here for a week.

This week's CASology cue card -


..Inspired me a lot.

Cut means a couple of different things to me - die-cutting paper and cutting fabric for sewing.

I decided to combine die-cutting and fabric and broke out some ANCIENT adhesive fabric paper that I bought years ago and have never ever used.

I die-cut it using one of my fave Sizzix border dies and added a few stitches to hold it firmly in place. You can just about see the stitches, so here is a close-up.


As I used fabric and stitching I thought that the sentiment from a Freebie set I have would be appropriate.

I love the simplicity of the card and the bright colours make it pop. I really must remember to stamp my sentiments in coordinating colours more often.

Cx

Monday, November 21, 2016

Bugaboo Thanksgiving...


Hey,

Happy Monday.

Hope you had a good weekend, can't believe it is nearly Thanksgiving already!!

I really want to enter Bugaboo challenges more, but I always forget!!

This weekend I saw the Bugaboo Catch The Bug November Bingo Challenge and I really liked the bingo card -


I went with the embossing, thanksgiving theme and bugaboo image line.

I started by importing my image (Autumn Jar) into my Silhouette Portrait, so I could cut around it. There were a few Bugaboo images that I wanted to do this with, so did them all at once. I'm fine with fussy cutting, but sometimes it is nice to do it with the Silhouette.

I coloured it using Promarkers and Nuvo Crystal Drops.

The embossing folder is a basketweave one by Sizzix and is one of my faves, I used the reverse side here, as I wanted it to be a bit flatter.

I heat embossed the sentiment onto a coordinating piece of the brown paper, I love this sentiment stamp, it's so detailed and heat embosses really well. So that it had a bit of stand out from the brown, I added a small strip of glitter paper underneath it before affixing it to my card.

I also added a piece of twine under the main image, again to make it pop a bit more.

So glad I played along, this is a fun card and I know where it's heading!

Cx

Tuesday, October 11, 2016

Retro Rubber #49..Boo! It's Halloween..


Hey,

It's time for another superb challenge over at Retro Rubber

We are not that far from Halloween, so we thought it was a great time for you to get digging around in your older Halloween stash..


Last year I explained how Halloween is a bit lost on me as I am English and it also just happens to be my Wedding Anniversary..

I recently had my Silhouette Portrait out, so I cut out a spider and web and let that dictate my card LOL.

I decided not to make my card too scary, so went with a grey backdrop. I remembered that I had some great Halloween washi tapes..somewhere..luckily I managed to find them and used them to add colour and text to my card.

I stamped, die-cut and coloured the MFT Mummy (from 2015) and mounted him/her onto my card, just slightly overlapping the spider.

I love it, such a fun card and I think my Niece and Nephew will like it too.

Show us your scary Halloween makes, but first go over to Retro Rubber and view the scary things my teammates have made..

Challenge ends on October 21st Don't forget to use a stamp a year or older and tell us about it that's part of the fun. Also, please limit your entries to 10 challenges including ours.

Cx

Saturday, June 25, 2016

Hello Summer!!


Hey,

Hope you are having a nice weekend so far..I am sad..the Brexit was not a good result in my opinion and makes me worry for the future of my land...

But moving onto brighter things it means that my Hubby is not working at all this weekend for the first time in 12 weeks, so we get to hang out - yay!

Gerda Steiner gave a freebie stamp this week, so we could all play along on Instagram using #surfingducky

Such a great idea.

I broke out my Silhouette Portrait for the first time in A LONG time... I used it to print and cut the ducky stamp and to cut the palm trees.

I decided to mount the trees and the ducky directly onto the card blank, as the colour fit my idea.

The sentiment stamps are by Papermania and Simon Says Stamp.

A super easy card to put together and it has already left in the post winging its way to a friend..

Cx


Sunday, April 12, 2015

Online Card Classes - A Cut Above: Part 2 - Day One


Hey,

So a couple of weeks ago, I finally got around to doing Day One of my Online Card Class - A Cut Above: Part 2 Electronic Die Cutting.

It was a lot of fun and I learnt some new tricks and manged to use a few cut files that I've had for a while.

The first part of the class is about using background files (my main photo). 
I had this fun background that I bought ages ago, but found it a bit much every time I tried to use it. In the OCC I learnt that keeping everything else simple (including colours) helps.
I added a red Happy - cut with my Silhouette and some mini gold glitter letters for Birthday - keeping it all very simple, but effective.

The next part required you to use a cut file supplied with the class. It teaches you how to scale and how to get these fiddly beasts off of the cutting mat!


I decided to use a spotty background and heart button to bring my cut frame alive. I like it, simple but also effective.

Layering shapes is one of my crafting staples. So I loved this part of the class and got to use the layered butterflies that I have had forever and never used!!


I switched it up a bit here and cut 2 of the butterflies in fussy papers, adding a bit more drama to the layers. The button with it's gold ribbon knot was already on my desk - perfect! I added an embossed background, a sentiment sticker and some bling.

Fun class, I am looking forward to Day Two..when I find some time..

If you haven't taken an Online Card Class yet, you really should - they are fun, easy and the best bit is that they are ALWAYS there. So you can do them at your leisure, great idea and means I don't get stressed about trying to keep up with a live class.

Cx


Friday, April 3, 2015

Loft Art Retreat..the cards...


Hey,

Happy Friday.

Can't believe its nearly a week since the fabulous loft art retreat, hosted by the AMAZING Jenn Shurkus.

I learnt so much and my fellow crafters were fun and diverse.

We made 15 cards - no mean feat!

Most items were cut out for us and we had to stamp, colour, fussy cut and assemble. It was oodles of fun.

There were quite a few highlights for me...

- Jenn taught us that we can really stretch our stash and get it to work for all occasions

- Crafters love to shop and buy new shiny stash items, they are not embarrassed, they embrace it - amazing!

- Tips, tips all over the place - I seriously had my eyes opened

- Quickie glue pen..how have I lived without you?!

- The funny, kind, generous people - truly a delight to spend time with.

I'm only showing you a few of the cards...the rest are here, far too many for one blog post :) Click on each photo for a description of what we used and did.

The main photo today is one of my faves from the day..stencils, dies (Lawn Fawn), inks, bold stamps (Winnie & Walter) - awesome.

One more photo for you -


I love this card, so simple but fun. Layered squares, stamped flourishes, quickie glue pen so you can add glitter and a new way to make banners..Dies and stamps by Lawn Fawn.

Sigh..I wish I could go on the mixed media one this month..but I am hoarding my pennies for Ma's visit.

Happy Weekend everyone..you'll find me at my desk, skyping and playdating with JT.

Cx


Wednesday, April 1, 2015

WOYWW #304...Calmer times..


Hey,

Happy WOYWW and welcome to April everyone.

As you can see my desk is much calmer this week..

I'm happy to be joining Julia and the gang for another fun WOYWW - the day where we all join up at Julia's blog Stamping Ground for a global desk nosy. Join in the fun...

My desk is calm, because I was away in Providence, because I went to a Jenn Shurkus loft art retreat. It was AWESOME. I met so many great and talented crafters - including Kymona. I earnt a whole host of new techniques and discovered some fun products too.

I'll be showing the 15 cards we made on Friday - crazy fun times.

I've labelled my desk for you. The new MFT hybrid ink was purchased at the retreat..it is really great and works so well with my Promarkers. I am colouring some digital stamps for a friends birthday gift.

I wanted to show you the lavender sachets I made for Jenn, I know a few of you mentioned that you would like to see them -

Lavender Sachets

Wrapped and ready to go
I loved making them - easy and fun. They smell so lovely..next time I'm going to put some of the Lavender heads in the bag.

Final piece of show and tell this week is the card I made to go with the gift. Jenn loves nautical items - 

I love American Crafts patterned card blanks, they make things come alive. I am also loving the reasonably new rounded rectangle stitched dies by MFT.

Hope you have a lovely day, see you for a nose later.

Cx

Thursday, February 19, 2015

Erasers put to work..


Hey,

For a while now I have been eyeing this great pin and tutorial on one of my Pinterest boards -


I figured I could make this work as cards..

I die cut a star, a heart and a butterfly - all from nesting dies - this is important for later on. Don't use the biggest die. I rooted around and found some un-used pencils and acrylic paints.

I then used removable glue to stick the die cut shapes to Canson Mixed Media paper.

As my paints are seriously old and dry, I spritzed the eraser with water and dragged it across the hard paint!

Then I dabbed over the edges of the die cut, I did this until the paint ran out and then got a bit more paint and repeated this tons of times. Then taking the next size up die, I cut around the eraser dabbed shape.

Once you have the finished die cut, you might need to add some more eraser dabs. To tidy it up and fill in some of the white space, I inked around the edges of the die cut.

I mounted the shapes onto contrasting card blanks and added a sentiment.

Fun way to spend an afternoon..here are the rest of the cards.


Cx

Thursday, January 15, 2015

Moving Along With The Times...Dies or Punches...


Hey,

It's my first MAWTT of 2015, so I get to wish you Happy New Year!

This week it is the lovely Hazel hosting and her theme is 'Dies or Punches'

Perfect for me, as I have lots of both!

I went with Dies AND Punches - dies for the square and the heart, punch for the sentiment label.

I decided to make a shaker card, as I had recently viewed the best tutorial ever here - you have to try it out, super simple and I managed to make a shaker without making a mistake :)

I used all American Crafts papers - scraps..(my quest to use them all continues into 2015..), the sequins, beads and glitter are just from my stash. I punched out a sentiment I printed, using a Stampin' Up mini label punch. I also used square and heart dies by Sizzix.

For a finishing touch I added enamel dots - a new purchase from Michaels...

Pretty pleased with this vision in pink! Only change, is next time I will use a contrasting colour for the heart background..

Now it's your turn to join in the fun, hop on over to MAWTT and check out Team B's fabulous creations.

Cx

Thursday, January 1, 2015

Happy New Year!!


Hey,

Happy New Year everyone and welcome to 2015.

Hope you all welcomed in the new year with fun things...this is a scheduled post, so I can't tell you how my new years eve went yet :)

As you know I love a Thank You set and I like to make sets for my personal thank you's.

For Christmas 2015 I decided to use some of my new stash - postage style square dies and leaf stamps - both of which were $20 challenge gifts from JT.

I used green card for my die-cut squares and then I stamped one of the lovely inkadinkadoo leaf stamps slightly off the edge in a contrasting green ink. I used a fave Thank You stamp for the sentiment in the same colour ink.

I then attached the die-cut squares to small 3x3 cards using my American Crafts mini stapler (like a mini attacher). For a final touch I added a contrasting green pearl

Simple and pretty too :)

They feel like little pieces of patchwork or quilting..

Cx

Monday, December 8, 2014

Skype playdate fun....


Hey,

Hope you had a good weekend! I did!

I hung out with Hubby this weekend, we did dinners and brunches and shopping and lounging..fun times.

Yesterday I had a great playdate with JT..we gossiped about craft and life stuff. We opened Christmas present early. It was mucho fun, just like old times..only remotely - little bit sad..

We made 3 cards using some new parts of our kit where we could.

The main photo today is of the first card we made. We used this gorgeous idea from Pinterest as inspiration.

Pinterest inspiration
I decided to use the new tag dies that JT sent me. I punched the white card using a random $1 EK Success punch. I assembled the tags using foam tape, a brad and a sentiment by Hero Arts. To finish the card I added some wooden adhesive dots.

I recently bought both JT a Ellen Hutson die - Treat Yo' Self - it has caused much hilarity between us. So card 2 was all about this crazy die -

Playdate Card 2 - Treat Yo' Self
I had the heat embossed piece on my desk already. A few nights ago I was having a play with my new SSS Dec card kit Ranger embossing powders this one is Enchanted Gold and its super glittery. I used it with a Heidi Swapp mini circles stencil. I die-cut Treat Yo' Self from a scrap of hexagon paper. I added 'it's your birthday' to give the big sentiment some context :)

I love this die, everything I make with it, makes me smile.

For the last card of the epic date, we worked with something we had purchased on Black Friday -

Playdate Card 3 - Something new..
I opted to use new papers that I bought as part of a random scrapbooking mini kit at Burlington of all places - for the grand sum of $3! The kit came with all kinds of stickers, so the gold start at the front is one of the stickers mounted using a foam pad. I die cut the star and the happy from scraps - the yellow paper was embossed, so adds a bit of texture.

I'm going to stamp Birthday inside this one before I use it.

A fun way to spend my Sunday morning. Miss you man.

Cx

Sunday, November 23, 2014

Christmas with the silhouette portrait...


Hey there!

It's been a VERY busy week - we did the biggest launch in my Company's history this week and whilst I am tired, I feel a great sense of achievement :)

I spent yesterday at my desk, getting Christmas cards ready to go into the post. I had x2 special cards I needed to make (can't say for who as they read my blog), so I decided to enlist the Silhouette.

Inspired by JT's card, I wanted to use some of the papers from a difficult stack we both have, that has velvet accents...looking closely it's the same piece of paper - how in tune are we!!

As you can see this card is my main photo today, I added the Silhouette die-cut reindeer (or should I say Snazzymoose?) and used a free stamp for the sentiment.

I love this card, it's so festive, but modern.

The second card uses a Silhouette die-cut card template - I don't often use these templates in their entirety, usually I just use parts of the card.

Cut with a Silhouette Portrait
I added a red liner, so you can see all the die-cuts.

Gorgeous right?! And simple - as it's essentially a bit of a cheat as the Silhouette did all the work! I used the same free sentiment stamp as before.

I love using the Silhouette, it's great and I have stopped beating myself up for not using it all the time. Now I bring him/it out when I'm inspired to - he gets an airing about 4 times a month, which works for me :)

Enjoy the rest of your weekend.

Cx

Monday, November 10, 2014

Treat Yo' Self....


Hey,

I'm back!!

Hubby and I had an excellent Anniversamoon in Mexico - it was just as beautiful as we remembered.

We did absolutely nothing, which was very refreshing. We did manage to charter a boat and go on a little trip on our last day and I snorkelled, which was fun.

Here is a photo of us, I will post a few more later in the week.


On to the main photo - my card. Recently I have been eyeing up shaker cards and different ways to make them. Liz of Pink Petticoat had a great idea / tutorial on her blog. So I decided to give it a go.

I bought tiny clear bags from a local paper store and filled one with sequins, glitter and beads, then folded a piece of card as per Liz's directions and used it to close the bag. Voila! Shaker bag.

I had it on my desk for a week or so before I left as I was unsure what I wanted to do with it.

I finally decided it would make a great addition to a card I wanted to make for a friend using my new Ellen Hutson 'Treat Yo' Self' die (I bought it for JT too).

I layered up American Craft papers, added the shaker bag, adhered the die cut to the bag and stamped the rest of the sentiment, so that the card would read 'Treat Yo' Self it's your birthday'

Ha ha.

I love it, I hope it arrived safely and that my friend loves it.

I'll be making more of these super easy shaker bags.

It's bittersweet being back home, back to the grind..but it was nice to be back at my craft desk yesterday.

Cx