Showing posts with label inspiration. Show all posts

Thursday, October 29, 2020

Fusion Card Challenge - Autumn...


Hey,

Welcome to another fab Fusion Card Challenge.

This time we have an 'Autumn' themed challenge. As always both the sketch and the inspiration image are fantastic.


Which will you try or will you fuse them?

Again, I loved both, so I fused them!

I was inspired by the wood floor and the mug. I created a little wood effect panel, using a Prima 'Salvaged Wood' background stamp and Altenew Mocha ink. 

I wanted to add a mug, so had a dig through my stamps and I actually found x2 fun ones. BUT as I am a HUGE fan of Monster stamps, it naturally had to be the Your Next Stamp 'Silly Monsters Chillout' one (YNS Monsters are my faves). I kept the mug white but added little grey dots at the top to emulate the one from the inspiration photo.

The little sparkly oval helped anchor my little mug Monster and matched the sketch.

This card is going to be going in a box of goodies for a friend, I think its a perfect use for it!

Make sure you check out all the rest of the inspiration by the DT over at the Fusion challenge blog, and play along with your own creation! 

When playing along you may use the sketch OR the photo to inspire your makes. OR, if you are feeling adventurous, you can fuse them together (see what I did there!).

Can't wait to see your makes. 

Challenge ends on November 10th.

Cx

Sunday, October 21, 2018

Scandinavian Background..


Hey,

So I keep seeing all of these great cards that are essentially a stamped background that is made up of lots of little stamps.

They always feel so Scandinavian to me - hence the title of my post.

I thought I would have a go and my own version and I am so in love with this, that I haven't made it into a card yet, I just want to keep looking at it!

I used the Pink Fresh Studio 'Dream On' set that was a piece of NBUS from Black Friday last year, pretty shameful as Thanksgiving is not far away..


I actually bought it because I love the bird / circle stamp.

I coloured it using Liquid Watercolours, which is a new medium to me and I am falling in love with it rapidly..I only have a few colours, but I like to try new things and having a few colours as a test is a good idea - full set syndrome will come.

I love making these kinds of backgrounds, it is a great way to use the teeny tiny stamps you get in sets.

I am actually thinking I might frame this and keep it..what do you think?

Cx

Saturday, September 22, 2018

Catch The Bug: Saturday Photo Challenge...


Hey,

Happy Saturday to you!

Hubby and I are heading to Philly this weekend to celebrate a good friend's 40th birthday,

This week over at the Catch The Bug Saturday challenge we have a photo challenge for you.


I decided to pull out the colours and work with reds and greens.

I love the Cherry Bird stamp and thought it worked really well with the photo.

I coloured the image, using Promarkers and die-cut it using a stitched circle die. I decided that it would be fun to stamp leaves onto the red background, again matching the leaves in the image.

It accidentally turned out to be a fun Christmas Card!

Hope you will be playing along too. Can't wait to see which image you choose to use.

Upload your makes at the Catch The Bug blog and check out the rest of the DT makes.

Cx

Tuesday, February 28, 2017

Retro Rubber Challenge #57..Colour challenge..


Hey,

Time for another awesome challenge with the Retro Rubber team.

This time we have a colour challenge for you - use the photo for the colour inspiration..


I was inspired by the jars in the image, so I pulled out one of my all time fave stamps by Unity Stamp Co. (Array of Vases from 2015).

I coloured it used distress inks (Squeezed Lemonade, Festive Berries, Mowed Lawn and Mermaid Lagoon) and an aquabrush to match the colours in the photo.

I decided that it would work best in a die-cut circle and thought the stitched scalloped version by MFT worked really well, as the image is so detailed, I didn't want to detract from it too much.

Final touches were to add a sentiment, stamp is by Kaisercraft from 2014 and the die-cut wishes is by Winnie & Walter - I LOVE their word dies.

I am a bit in love with this card, the vases really pop..might need to make a few more.

Your turn to show us your makes and pop over to Retro Rubber and get inspired by the things my teammates have made..

Challenge ends March 10th. Don't forget to tell us the age of your stamp, that is part of the fun of our challenge and please only enter 10 challenges including Retro Rubber.

Cx

Monday, December 19, 2016

CASE: Circle Mask Flowers...


Hey,

Happy Monday.

Only 3 more work days this year, then rest, desk playtime and hangs with the Hubs, glorious.

When I am a bit stuck for inspiration and want to play at my desk, I head over to my Pinterest ideas board..

I came across this -

Image credit - Therese Calvird for Altenew
Gorgeous right?

So, I decided to have a go. I had two scrap circles on my desk, so I used those as my centre masks - one is bigger than the other.

I used a great Artist Loft circle template to create my circles - if you don't have one of these, you need one, they are super useful. I used mini daubers to apply the colour.

I stuck with four colours for both of my cards - all distress inks - Picked Raspberry, Spiced Marmalade, Mustard Seed and Peacock feathers.

Before I lifted off the circle mask I stamped all the details onto my inked circles, to create the flowers. For this I used three Simon Says Stamp sets and a Lawn Fawn set - Scribble Flowers, Favorite Flowers, Handwritten Floral Greetings (SSS) and Our Friendship Grows (LF).

Here is the other version.


To finish off I die-cut the panels using a SSS stitched die and added the sentiment. The sentiments are also by SSS Sketchy Banner Greetings and dies (they don't make this set anymore)

Sounds like a lot of work, but it really was very simple and I had a lot of fun creating them, totally doing this again.

As this is a CASE, it is only good manners to provide links to Therese's blog and the Altenew post.

Cx

Tuesday, November 1, 2016

Retro Rubber #50 Colour Challenge..Still time to play..


Hey,

There is still time for you to join in with the current challenge over at Retro Rubber

This time we want you to use the photograph as a colour inspiration..

Show us your interpretation of the photo, check out the makes by the DT over at Retro Rubber for inspiration

Challenge ends on November 4th. Don't forget to use a stamp a year or older and tell us about it that's part of the fun. Also, please limit your entries to 10 challenges including ours.

Cx

Tuesday, October 25, 2016

Retro Rubber #50..Colour Challenge..

Hey,

It's time for another awesome challenge over at Retro Rubber

This time we want you to use the photograph as a colour inspiration..


The colours in the photo made me think of Foxes for some reason.. So I dug out my Lawn Fawn Winter Fox stamp and die set (from 2014) and used that as my base. I coloured the Fox using Promarkers and glitter.

I tried all kinds of backgrounds and finally settled on the Mama Elephant wreath stamp (from June 2015) and messily watercoloured it, using the colours from the photo. I die-cut the panel using a square stitched die by Simon Says Stamp and mounted it onto a small kraft blank (from JT).

I mounted the Fox using foam pads and added a simple sentiment by HOTP that was a freebie with a magazine last year.

Lots of older stamps used here, so a total win in my book and a really simple elegant birthday card at the end of it all.

Show us your interpretation of the photo, but first go over to Retro Rubber and view the great makes by my teammates.

Challenge ends on November 4th. Don't forget to use a stamp a year or older and tell us about it that's part of the fun. Also, please limit your entries to 10 challenges including ours.

Cx

Sunday, August 14, 2016

Housework can't kill you...


Hey,

Hope you are having a fun weekend so far.

I am off to a birthday dinner this evening - looking forward to that, as it is in Hoboken and I don't go there often.

I recently discovered that I had won my second Papercrafters Corner Magazine Cover Challenge #153) - how fun is that!! AND it was the 2nd one in a row - yay!

I love this week's cover and there is just enough time for me to squeeze in an entry to this weeks challenge -


For this make I am using one of my new watercolour postcard blanks.

The pink tones really inspired me, so I used those to create my background. I decided that the retro stencil kind of reminded me of the records on the cover..tenuous?

I love the 'Elks' bold font and colour, so used that as the inspiration for my sentiment. This was my first attempt at hand lettering, it's not perfect, but practice is good..

The 'housewife' stamp was a freebie from Creative Stamping magazine last year, I coloured her as close as I could to the lady on the magazine cover using promarkers.

Final touch is to spray the postcard with fixative, so it doesn't get ruined in the post!

I am very pleased with it, it's cracking me up and winging it's way to Momma.

Cx

Thursday, August 4, 2016

Pattern Stamping...


Hey,

Jennifer McGuire recently posted a video about pattern stamping with a MISTI.

As my new mini MISTI arrived last week, I decided to have a play and I am SO super happy with the results.

Here are the cards that Jennifer made -


Gorgeous right?

I followed all of the steps carefully and found it was all pretty easy, but time consuming as I made four 4x4 panels at once!

I don't know why, but my heat embossing came out really well - I couldn't believe that I nailed it FOUR times - yay!!

Here are two more of the cards I made..


I love how they look and in 'real life' they are stunning - even if I do say so myself :)

I used a mix of stamps by Paper Smooches and Simon Says Stamp to create my pattern.

When I am home next week, I am going to try a version where you only stamp the pattern on part of the card.

Cx

Friday, July 29, 2016

CASE A Card..Grid Scraps...


Hey,

Happy Friday.

I am leaving for London later on today, so my posts will pretty much be scheduled for the next 10 days..

As you know I have been recently having a Pinterest CASE frenzy! Today is the latest one.

I saw this card -

Image courtesy of Snippets by Design
I really liked the grid idea and the idea that it could be made from scraps. Wasn't keen on the twine though, so left that off of my card.

As you can see from my card, this isn't a straight CASE. I used all spotty papers by Lawn Fawn, die-cut and heat embossed sentiments and added little pearls to my heart and star.

Not the easiest card, as I had to work out the grid, so I could cut the scraps to size, but it was a great way to use scraps and is so bright and spotty I love it.

I need to think about how to make it easier, so I can make tons of them :)

Have a great weekend, see you in London tomorrow.

Cx

Monday, July 18, 2016

CASE a Card...Flowers..


Hey,

Happy Monday, I am off today, hanging out with Ma, following our weekend in Philly and Sunday spent with JT's parents.

Following on from yesterday's post, I thought I'd show you another of my Pinterest CASEs.

I chose this card - 

Image Courtesy of Cupcakes, Cards and Kim
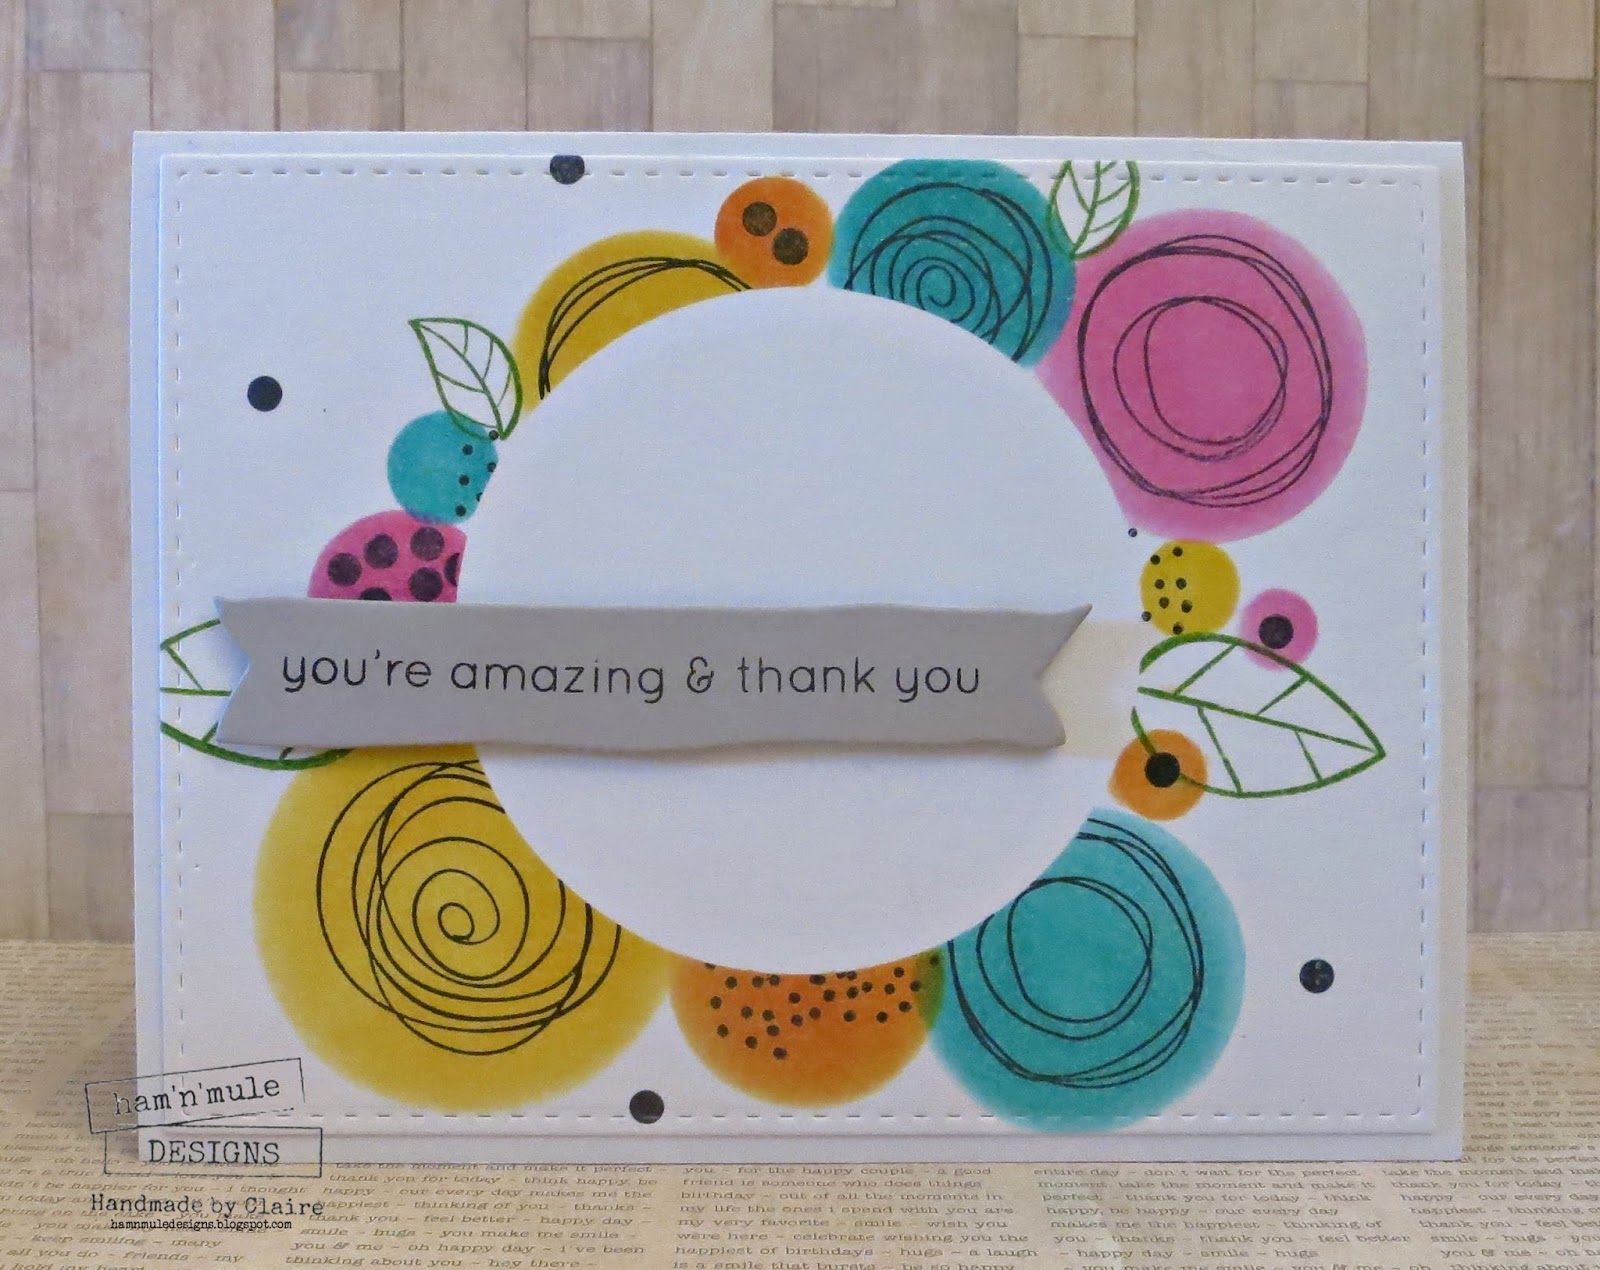
I love this idea of scribbly circles as flowers..

I pulled out three stamp sets by Simon Says Stamp - Scribble Flowers, Favorite Flowers and Birthday Flowers to use on my card.

I also decided not to stamp the solid circles but used Distress stains and kind of splodged them onto my paper..

For the main card I used Abandoned Coral, Squeezed Lemonade and Peacock Feathers stains. It is a pretty straightforward CASE, no real modifications, but it was so perfect, I didn't want to change a thing :)

Obviously I made a whole bunch of these as they take about 5 mins to do, once you have got your colour splodges down.

Here is another colour variant, using Picked Raspberry, Mowed Lawn and Peacock Feather stains -


These were super simple to make and I really love working with Distress Stains, you get such rich colours and no mess!

Cx

Wednesday, July 13, 2016

Papercrafters Corner..Magazine Challenge #152...

Hey,

Recently whilst I was bumbling around blogs I stumbled across Papercrafters Corner - a great resource and they have an awesome challenge.

They give you a magazine cover as inspiration, you can pull out any of the elements for your project.

Here is the magazine cover for the current challenge #152 -


I love it and immediately thought it would make an awesome art journal spread.

So many of the elements inspired my spread..some are obvious, vintage lady, car, birds, map. I also used the colours from the background and the car to inspire my colour backdrop.

The grid in the car inspired me to stencil a grid here and there.

The map was the basis for my 16 scalloped rectangles, which if you look closely are the US states ;)

Just below the lady in the inspiration image there is a small piece of text, so I added some random text to my spread, you can also see subtle references to 1921 throughout my spread.

Finally I used the signpost as the main inspiration for my spread, I used the New York reference throughout and interpreted the signpost as arrows - all over.

This was such a fun spread to create, I can't wait for next week's inspiration cover.

Cx

Friday, February 26, 2016

Designer inspiration...


Hey,

Happy Friday..

So Hubby and I are now in Melton Mowbray with his family, before we go to a good friend's wedding tomorrow.

We have had a great holiday, it was awesome to go back to Amsterdam.

I wanted to show you another stamp that I made using the Silhouette, like the Thank You stamp I showed you last week.

When I was making my own stamps I decided that two stamps would be good to start with. I decided that a word stamp and a nature stamp would be useful for me.

So I searched for inspiration and I happened to be in London at the time and saw quite a bit of Orla Kiely's work. I've always loved her signature ferm, partly because she does so much with it and because of the colours she uses.

I decided that a fern stamp would be a great one to make with the Silhouette.

The main photo today is of one of the cards that I made with the stamp.

Because I tried several different colour variants, I decided to create a chart that I could file with the stamp, so that I didn't have to re-invent the wheel every time I use it!


I used a random stamp and the Distress Inks to create the chart, I also added numbers, so I remember the order of the colours. The random piece of cardboard is recycled - I recycle as much card / paper as I can and if it's not going on a card, it doesn't really matter.

Here are the rest of the cards I created -


I am really happy with this stamp and I can see it getting a lot of use. I bundled this batch up and gave them to my MIL as a gift.

Have a great weekend. No posts from me - wedding, travel to London = not enough time to blog.

Cx

Thursday, February 25, 2016

To be continued..


Hey,

So following on from yesterday.

I thought I'd show you some things I made using the die-cut remnants that I keep.

I started with these - stupidly forgot to take a photo before using and the hello is too damaged to be photographed..

I used Distress stains, inks and paints through the 'stencils' and then either stamped, stenciled or heat embossed over the top.


I am super pleased with the butterfly, as that is the Tim Holtz Lace stencil over the top of the Distress paint and I heat embossed it too...technique cray cray.

So the title of the post is the point of how these cards will be finished. Like the main card today, they will have no sentiment..

I like to do this, so when I need a card and I am low on inspiration I have something that I have already made ready to go and it helps me.

Then I just add a sentiment or an embellishment and they are ready to go. Fun to do when I have the time..

Cx

Monday, February 1, 2016

I see you...

Hey,

During Superstorm Jonas :) I spent oodles of time at my desk.

When I saw the latest Simon Says Stamp Wednesday challenge -  Anything goes, also had the DT using SSS exclusive products, I knew I had a lovely card all ready for this one that had been made during Superstorm house arrest LOL.

I love SSS exclusive products and have A LOT of them..

I had really wanted to try out heat embossing bright colours onto kraft card, I'd seen it on this blog with the same stamp set and I thought it was really impressive.

I love how my hot pink embossing has come out, it really pops against the kraft card. The glasses and the sentiment stamps are from the Simon Says Stamp October 2015 cardkit.

I mounted this onto a die-cut piece of beautiful Bazzil cardstock from the SSS April 2015 cardkit.

So impactful, so simple..it's going to make a great Valentine's card.

Perfect fit for the challenge and a great use of my SSS products and cardkits.

Cx

Saturday, November 21, 2015

Metallic CAS Hearts...


Hey,

Happy Saturday to you all, hope you are having a good weekend so far..I am nursing a slight hangover...

I was inspired by JT's CAS-ual Friday entry to have a go myself...

The CAS-ual Friday theme this time is precious metals..


As JT used Silver, I opted for Gold..in part because of the superb Tsukineko gold ink that I have...

I found a random pack of chipboard hearts recently, so I dug one of those out and painted it with metallic gold acrylic paint..I stamped a few different Simon Says Stamp hearts around, mounted the chipboard hearts and added a Tim Holtz small talk sticker - that I cut to size.

Simple, CAS and it's going to be an anniversary card for some friends...Wins all round in my book..

Enjoy the rest of your weekend.

Cx

Thursday, November 12, 2015

Ahoy Captain!

Hey,

I love Simon Says Stamp cardkits, the best thing I ever did was signing up for them.

If I am ever stuck for inspiration, I turn to the folder that houses all of the kit overview sheets and papers and voila! Inspired.

I had to make some male cards for a friend and I turned to the July 2015 cardkit, all the papers and boat stamps are from the kit. 

The dies are MFT and Lawn Fawn and the HB sentiment is by Clearly Besotted. I added a white enamel dot to the main card, it was supposed to be a brad..but that's what happens when you stick things down too soon.

Here's the other card - 


Again, really easy cards to make..I am really happy with my new Lawn Fawn stitched curvy border dies, they make excellent, Sea, Snow, Grass and many more things :)

Cx

Thursday, February 19, 2015

Erasers put to work..


Hey,

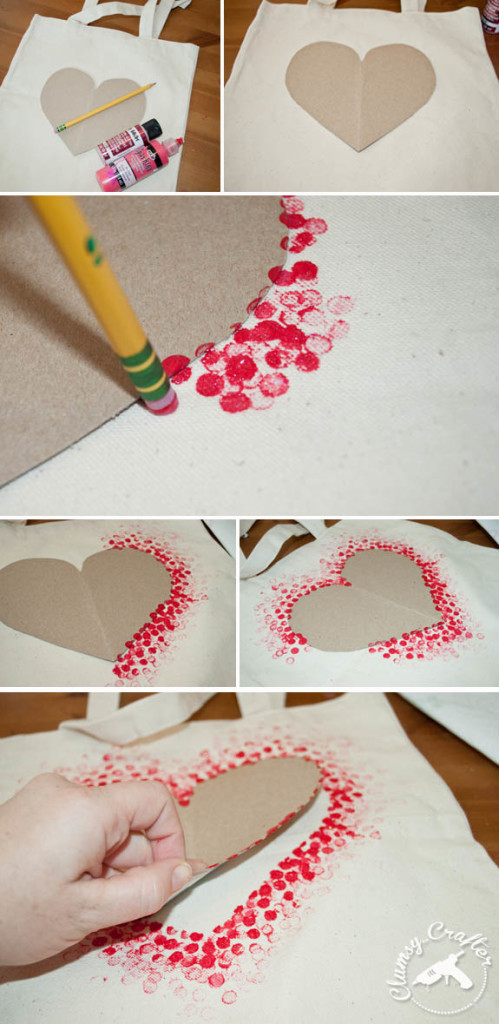
For a while now I have been eyeing this great pin and tutorial on one of my Pinterest boards -


I figured I could make this work as cards..

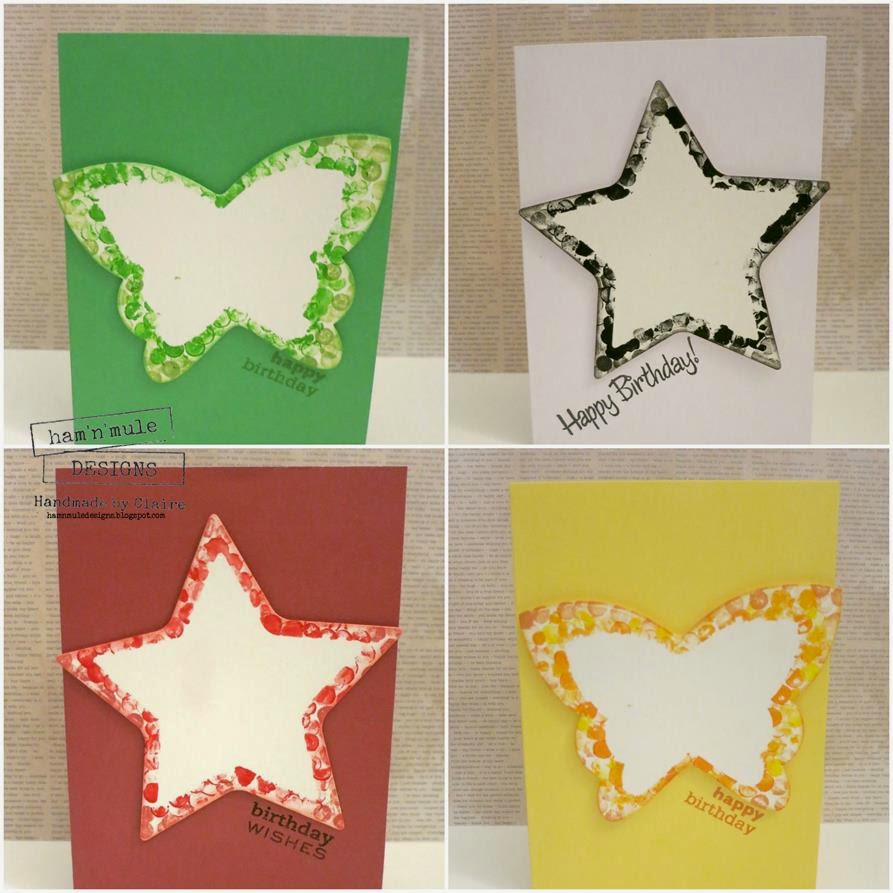
I die cut a star, a heart and a butterfly - all from nesting dies - this is important for later on. Don't use the biggest die. I rooted around and found some un-used pencils and acrylic paints.

I then used removable glue to stick the die cut shapes to Canson Mixed Media paper.

As my paints are seriously old and dry, I spritzed the eraser with water and dragged it across the hard paint!

Then I dabbed over the edges of the die cut, I did this until the paint ran out and then got a bit more paint and repeated this tons of times. Then taking the next size up die, I cut around the eraser dabbed shape.

Once you have the finished die cut, you might need to add some more eraser dabs. To tidy it up and fill in some of the white space, I inked around the edges of the die cut.

I mounted the shapes onto contrasting card blanks and added a sentiment.

Fun way to spend an afternoon..here are the rest of the cards.


Cx

Saturday, April 19, 2014

A new craft crush...


Hi,

Happy Weekend to you all.

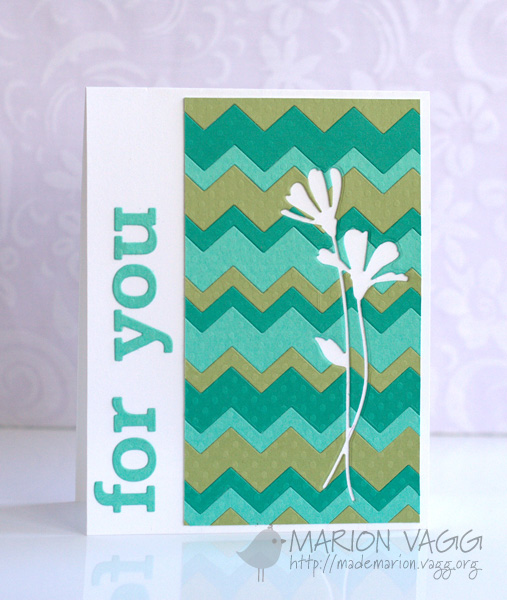
I recently came across the work of Marion Vagg on Pinterest and fell head over heels in love.. I really loved the chevron paper piecing she did and wanted to have a go.

Here are a couple of examples of Marion's work -


As I don't have a chevron die, I decided to enlist the Silhouette to help me cut some chevrons. I cut a bunch of them - all the same size in 4 colours.

You can see my favourite example of how I used them in the main photo. As I was limited to just a few chevron strips I tried to use them in unusual ways to maximise the white space.

It was so much fun to do and I am going to cut a few more this weekend in different sizes and maybe even patterns and see what I can make out of them.

Here are a couple more of the cards I made.

Chevron Alien

Chevron Flower
What did I use? All papers by co'redinations, card blanks from Craft UK, frame by Dovecraft, flower from the Range, Alien from the Works - all UK based craft stores or manufacturers. The Alien has a peel off sentiment, the flower uses a Woodware stamp and the frame uses a Hero Arts stamp.

A fun way to start the weekend if you ask me! I am now off to brunch :)

Finally I have already thanked Marion for inspiring me with her beautiful work, but I just want to say it again 'Thanks Marion...you are my latest crush'

Cx

Wednesday, December 18, 2013

WOYWW #237...Happy Valentine's Day..


Ha ha sorry to confuse you! But that's what it feels like here...

Before I tell you about it, let's do the important stuff. Today it is time for WOYWW...don't know what I am talking about? Get on over to Stamping Ground and meet our wonderful host Julia and the rest of the gang for the weekly global desk nose..

I am deep into Valentine's Day cards for OWH...as you can see from my desk - partially made cards, hearts, heart punches mini and small, Be My Valentine stamp, mini trimmer, glasses, tweezers, ATG, pencil, stack of completed cards and papers in Valentine hues!

Here is a proper photo of the cards you can see on my desk...

OWH - Be My Valentine
I used an idea that I saw on Pinterest, I loved the idea of a plain card, with a simple sentiment and a busy focal point. Kasia Curry is the card maker and she makes such beautiful things, I love her work. I wanted to credit her, so she knows I am not wilfully stealing!

Card by Kasia Curry via Pinterest
Finally before this post becomes epic..I just want to say thank you to all of you for being such wonderful blog buddies during this strange and exciting 2013!! Have a wonderful Christmas wherever you are.

Cx