Showing posts with label glue. Show all posts

Wednesday, January 23, 2013

WOYWW 190 - Cutting, cutting, cutting


Whoo hoo! It's Wednesday, so it's time for WOYWW, hosted by the wonderful Julia over at Stamping Ground.

If you are new to WOYWW, it's the time of the week where you get to look at craft desks from around the world - whatever state they are in.

As you can see my desk is a bit equipment heavy this week and seriously untidy!! I hardly ever leave my desk like this, but with the snow, the epic journey to work and the cold, I just haven't felt like tidying...don't judge me...

I decided to follow Julia's twofer post from WOYWW 189 and give you bonus desk pictures. The main photo is of my entire desk and I thought you might not be able to see the detail (this is the best bit of WOYWW for me - the nosing at the detail..), so here are 3 more photos.

Left Side -

Some boxes full of odd bits and bobs - papers, embellishments, etc, on top of the boxes are some anniversary cards that I thought I'd finished, but now think they should have a greeting - advice please. You can also see some paper twine (which I love and it's from Poundland!), Sizzix die cut flowers and Scottie Dog die cuts, the flower punches from last week and a small selection of pro-markers, tape, stamps - aaaaaaargh!! Why is there so much and this is ONE side of my desk....

Middle -

The Big Shot, the new journal layout - just peeking out behind that is my set of Xcut tag dies, my stack of ribbon, in the background propped against the glue pots is a little New Baby gift I am playing with - you can just see the blue felt 'Y' against the patterned paper. On top of the big shot to the right are some magnetic shims I am trying out (£2 on sale) - so far so good I really like them.

Right Side -

Good old ATG + glasses on top, Sizzix packaging....more new stuff (oops), scissors, my desktop recycling bin that needs emptying, my paper trimmer, various punches and inks and just poking out from under the Sizzix packaging is my beloved Versamark black ink pad - what on earth would I do without you?

How on earth did my desk get so messy?! To reward you for your patience and to prove I do not just buy new goodies and that I do actually craft :) I took a photo showing of the Scottie Dog card I am planning for a boy birthday.

Cute right? I'm also hoping to make a few of these for sale on the website...which needs updating with the Valentine's Day stuff...this weekend for sure.

Happy WOYWW and thanks for your patience today.

Cx

Wednesday, January 9, 2013

WOYWW 188 - 9th Jan 2013


Yay! I love WOYWW. Happy Wednesday everyone.

Once again I took my photo on a Tues night, as I have to leave too early in the morning to take the photo and get the post out.

Just incase you don't know what WOYWW is, it stands for What's on Your Workstation Wednesday and is the brainchild of the awesome Julia over at Stamping Ground.

So what is on my workstation...

A stack of Pink Petticoat papers that I have printed out to make some cards for my work colleague Katie - as a leaving gift from me. You can see the cards that I am making for her in various stages - one is finished, another is semi-assembled and there are a couple near the front where I am still playing with ideas. You can just see my new paper trimmer in the right hand corner - finally got round to getting this ordered, no more frayed edges for me! The massive pile of buttons is there because I like to tip them out and shift through them when working - it inspires me. I am working with the Papermania Big Blossoms right now, as I love them. Behind the card that is finished is a stack of ribbons and twine, some are new and some I got out to encourage me to use them. The little green box is a Dymo tape that I just bought for the machine Hubby 'found' in the loft before Christmas. JT's butterfly punch is there, as it's on loan so I can punch a batch of butterflies before I leave..Oh and there are 2 new tacky glues that I want to try - one is clear and the other is white and dries super fast (apparently) - obviously following the UHU  incident I am a little bit nervous about new glue.

I am looking forward to getting home tonight and making a few more of the cards that are on my desk. Katie mentioned that she is loving Spring colours right now, so all the papers are Spring oriented.

Cx

Monday, October 29, 2012

Stick with what you know...


Literally I will be 'sticking' with my regular white craft glue and never want to see UHU again! I followed a little tip and bought a tube, thought it might help me getting buttons to stick to cards better. Well it certainly did that, but it also ended up all over me and the craft room.

Basically it comes out too quick and is too runny and it scared me a bit!

Anyway, I wanted to use this weekend to make some non Christmas items, but was feeling a bit short on inspiration. So I popped over to Pinterest and had a rummage through my craft ideas and also at Edie A's cardmaking board, which is amazing.

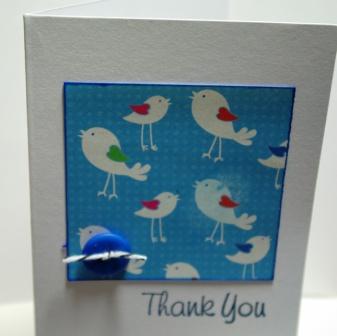
Today's main photo is of one of the cards I made using the following card as a guide -


I always feel that any cards I am 'copying' should be modified in some way to make it feel like I actually did something...
They were fun to make sp I made them in 3 colours - the UHU was the only sticking point (ha ha). I tried a new technique of running an ink pad around the edges of the paper square, it's really easy, but choose your ink type carefully - the pigment ink does not dry in a timely fashion and I ended up with it all over me and ruined a couple of cards. Chalk inks are much better.

I think the twine threaded buttons look cute, but I felt they were a tad too much effort - here is a detail photo so you can see the inked edges and the buttons


I advise using a 6 x 6 piece of paper and cutting it into 4 equal sizes squares, I found using detailed papers worked really well at this size

The papers are all from a set that I bought earlier in the year, but didn't really know what to do with them.

Here are the red and blue ones


Choosing a contrasting ink colour for the edges, really makes the paper squares stand out on the white cards.


Below is a detail shot of each card.


I opted for no twine on the red cards - don't like it as much.


Once I am back from Amsterdam, I'll post some more photos from my inspiration session.

Cx