Pages
▼
Pages - Menu
▼
Wednesday, May 30, 2018
Catch The Bug GDT: Wednesday Tutorial..Lipgloss Holder
Hey,
So part of my GDT stint with the Catch The Bug team means I get to create a tutorial!
I thought it would be fun to show you a project that I make all the time and I've even made them with my non-crafty Mother!
I seriously make these little lip balm / gloss holders A LOT. They are a super easy and inexpensive little gift to give and I like to have a stash on hand.
You will need the following supplies: image, white or coloured card, colouring medium, scoring board, single hole punch, glue dots, ribbon and a lip balm / gloss (I get mine in bulk from Amazon)
Step 1 - I chose to use 'I will accept' colouring page by Bugaboo. Print it out at letter size and it should look like this -
Step 2 - Cut your 'panel's' to size. 7cm deep by 17.5cm wide.
You will also need a piece of white or coloured card (not shown) and you will need to cut that to size - 8cm deep by 17.5cm wide.
Step 3 - Colour your panels. I use Promarkers, they are my fave markers. I always choose 4 colours, no idea why, I just do and I don't colour the entire image, I like to leave some parts white. This is the fun part :) Colour your panel however you like.
Step 4 - Affix the coloured panels to your plain panel, leaving a small border either side (not shown, but you will see what this looks like in the step 5 photo).
Step 5 - Place your panel on your scoreboard. Sadly we now have to work in inches! Your panel should be 6.5inches long. You need to score at 3 inches and 3.5inches, this will leave enough space for your lip balm.
Crease at the scorelines. And it should look like this -
Step 6 - Now open up your folded panel and add two glue dots to the central panel -
and then add your lip balm / gloss.
Step 7 - Fold the 'card' so the edges meet and then using your single hole punch, punch a hole for your ribbon. It is important that you DO NOT do this step until after you have added the lip balm / gloss.
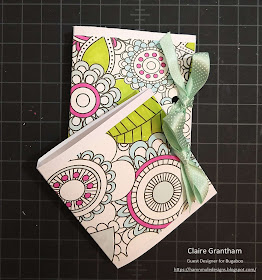
Final step - add the ribbon, tie into a bow and voila! you are finished..
Aren't they cute?
Super easy to make, but feel free to leave me a comment here or on the Catch The Bug blog if you have any questions.
Cx
1 comment:
In line with new Data Protection legislation (GDPR) commencing 25 May 2018 by commenting you do so in the knowledge that your name & comment are visible to all who visit this blog and thereby consent to the use of that personal information for that specific purpose.
Thanks for swinging by and leaving a comment, I appreciate it..I will come and visit you too! IF YOU GET THE I'M NOT A ROBOT COMMENT, IGNORE IT AND CLICK PUBLISH AS NORMAL.
Thanks Cx


That's such a sweet little gift. I'll definitely have to try making some. It looks like the colouring is very therapeutic too x
ReplyDelete