Pages

Pages - Menu

Thursday, May 31, 2012

Holibobs here I come...


It's been a busy week so far, working, packing, last minute crafting (scarves, etc), catching up with friends and tonight I am off to a very large leaving do. Something tells me I might not be feeling too prety tomorrow....which is unfortunate as Hubby and I are flying to NYC tomorrow lunchtime!

Today's main picture is a cute dinosaur card I made as part of an order, using some new embellishment and papers. The dino is so cheery he makes me smile.

The card below is really simple and I can see myself making lots of these. I embossed photo paper, I like to use white paper, but it can look a bit bland so the gloss makes the dots pop (I buy it cheaply from pound shops) and isn't at all bland. I used my Crop-a-dile to add eyelets to the sentiment tag, I don't normally like the white eyelets, but I think they work here. The large paper flower is by Papermania and I got a whole stack of them in different colours for 99p a pot (approx 20 flowers) from WHSmith's.The green twine is from my local poundshop and I got 20 metres of it - score!
Happy Birthday using photo paper
This card is a fun one for kids. Ages ago, I bought a big pack of glittery Christmas gift tags in the sale, I have used them in all different ways, but had forgotten about them until recently. I think the eyelets make the card fun and it was really easy to make. Once again I used photo paper and the sentiment stamp is my new fave and I got it free with a magazine.
Happy Birthday Glitter Star
Anyway the wine is calling me! I hope to blog whilst in NYC, but maybe I'll be too busying shopping, drinking beer, eating and watching bball.....

Cx

Sunday, May 27, 2012

Summer has arrived - at last!


Hello!

It's been a busy 2 weeks and summer seems to have arrived - it's been glorious. Really nice to put away the winter wear and get out the dresses and sandals.

This weekend Hubby and I have been putting the new blinds up - annoyingly it would appear I measured 2 of the windows wrong, which is an expensive mistake. Next time Hubby WILL check my measurements. It hasn't all been DIY though, my parent's popped over for brunch on Saturday, which was fun and Hubby and I went to dinner at the local Italian and sat outside in the fading sunshine drinking wine - awesome.

On Sunday I finally took some photos of the things I have been making over the last couple of weeks. Today's main picture is of an anniversary card I made for friends using an idea I saw on Indulgy - great site for inspiration. I think this is a clever idea and there is another version using die cut stars, that's next on my list. I used my brand new super duper Woodware heart punch - long overdue purchase in my opinion.

I've been making cards for a couple of large orders and as the customers weren't fussy about what designs they got, it meant I got to try out some new ideas.

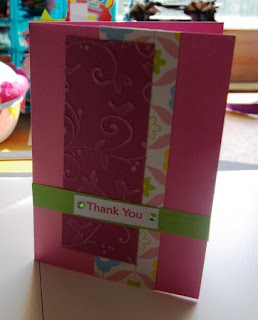
First up are these thank you cards - I really like using tall / DL cards, but it means my embossing folders aren't long enough, so I used some sticky ribbon to create a break so you don't realise that I actually can't emboss the entire strip of paper. The sentiment is stamped on a die cut shape and as I mentioned in my previous post, these cards are a variation of the previous butterfly cards. I like this sewing on cards thing. I am pleased with how these ones came out.

Thank You Butterflies

Thank You Butterflies Purple
In my previous post I showed you a template that I had modified slightly - here's a picture. I basically cut rectangles of card, that I could lay over the printed cake tiers and stitched them in place. I then used glitter glue for the candle and around the cake tiers. Unfortunately my photo is a bit blurry, but they look amazing in real life - honest!

Stitched Tiered Cake
I thought I'd treat myself and enter a challenge - I liked the sketch on Mojo Monday 242 - here is my version of it.


I used grey canford card, the star paper was free, Lettering Delights ice-cream, Martha Stewart punch and a blue sparkly adhesive dot. I think it's fun....maybe it needs a sentiment.

It was quite a nice break to make something for a challenge. I have a few more things to show you that are for the orders. However, I think post is getting super long! So I'll save those for my last post in May, which will also be my last post before Hubby and I head to NYC. Yes I am super excited and yes I am heading to Michael's.

I know that I always seem to be heading to Michael's when I on my holibobs, but this time I have a legitimate reason. JT is away at the moment and we have agreed to do a $20 craft challenge. Basically we have to buy each other $20 of craft goodies - it can be lots of little things or one big thing, but we get to choose things that we think the other one might like and might not buy. This is a great idea and I think one we are going to be using for quite some time.

Cx

Sunday, May 13, 2012

Organisation is key!


So the flat is still chaos, but there are 2 high points - 1) all the windows are now in and they are beautiful and 2) the craft room is habitable. Yay!
I think Hubby made sure that I could get back in there (albeit temporarily) so I didn't murder someone! I hate not being able to craft at the weekend.
Did I fool you with the main picture? That is so not my craft room - I wish. The new shelving has given me food for thought, so I am carefully sorting through everything I took off the old shelves and re-organising. I have bought new Really Useful Boxes so I can get rid of some of the more makeshift storage I've been using. Whilst I was working at my desk today, I realised that my Epic Six is in an awkward position, it's been relocated now and I am much happier. I think this is going to keep happening whilst I work out how to best use the space.

Today, I have been mainly working on a couple of big orders I have to fill, as I am a bit behind due to the window chaos. Sorry no photos for you, as I can't actually find my camera - so I'll take some later in the week.

This is a template from Sew.Craft.Create and I used it today, but modified it slightly (you'll see later on in the week)

I think this template is going to come in really handy, it's so easy to use.

I also made a few of these butterfly cards - I mentioned them before, they are really easy to make and I slightly changed the style of them today - once again photos later in the week.


I made a few more of these rocket cards - I change the colours so they can be suitable for kids or adults - this one is for an adult, using muted tones. The rocket is a Cuttlekids die - they are great and reasonably priced - I find it's a good idea to cut them out using white cardstock and then colour them using Promarkers, otherwise the flame is hard to do. I used my favourite star and big dot embossing folders.


A very nice day to round off a nice weekend.

Cx

Wednesday, May 9, 2012

Furchildren.


As I am at home recovering following my hospital visit, I thought I'd stay away from craft things, so I don't exert myself too much. The pictures today are of our furchildren - Archie - is below and looking especially cute and Bos is the main picture today and looking very posed!


Bos does like to help when I am making things - especially when I am sewing...
Archie is more of a recluse and doesn't like any noise that might occur during my craft related activities, so actively stays away from me when I am working in the craft room.

They are both on our bed - the fetching zebra blanket is covering our bed to prevent it being covered in fur!

I am loving the instagram app - I think using it has made the cats look even prettier.

The windows are still being installed (not today though) and should be complete early next week, hopefully I'll be able to restore the craft room before then. Hubby assembled my new shelves today and they are now back in the craft room. Everything is just shoved on the shelves - this is because I realised that I need to (yay!) purchase alternative storage to the makeshift stuff I have been using - time to get online and start spending some of that HamnMule money.

Hurrah!

Cx

Monday, May 7, 2012

The long weekend


It's been a pretty good weekend, despite the chaos in the flat due to the new windows (which are beautiful) finally being installed. The craft room doesn't exist at the moment and everything is everywhere and the cats are freaked out. So are the adults to be fair!

On Friday night, Hubby and I went to visit Lemon to start her birthday celebrations (Saturday was her birthday) she cooked. Score. It was fun and relaxed, I couldn't handle much more than that after the wretched cold.
Saturday was originally going to be a day of chilling, but Lemon and I both fancied hanging out some more so we into town to shop and eat din dins. We had such a laugh and I started to feel better. Today's main pic is of Lemon and I eating doughnuts in Selfridges! Unfortunately Hubby couldn't join us as he had to work. Boo!
Yesterday was the chore day, we hired a van, sorted the cr*p in the flat, went to the dump, made a list, went to IKEA (yes on a bank holiday Sunday, we are insane enough), came home, tided a bit and then slumped around.
I managed to create a craft space in amongst the window related chaos in the flat. Here's a pic of the craft space - its cracking me up. I am perched on the edge of our bed and have managed to track down the essential tools and stash that I need to work with - in the background behind the desk is our chest of drawers that is covered in stuff from the craft room.


I made some lovely owl cards and some bunting ones for the charity sale. I also had an idea and started to make a complicated bunting variation (let's see how this pans out later in the week...)

Today I have been sewing tank top tote bags - photos are below. So easy to make and fun too. I took several different pics,to create a mini tutorial (the finished pic isn't great sorry).

Step 1 - Fold tank top inside out and match the straps up
Step 2 - Sew both sides together
Step 3 - Mitre the corners to add strength
Step 4 - Fold right side out - voila! Finished tote
I managed to make 4 of these in 25 minutes - here's a pic of them all piled up ready to be gifted to friends and charity.

I am thinking about making little drawstring pouches to store them in, but I can't decide...

I also made these -

based on an example I found on Pinterest. I used a mixture of embellishments I bought when I went to Berkhamsted a few weeks ago, flowers JT gave me, flowers, papers and bling from my stash. I like them, think these will be going in the charity pile.

I have to go into hospital tomorrow, but I'm not going to dwell on that. It's more exciting to point out that all the pictures on the blog today were taken on my new (= previously belonged to Hubby) HTC using the Instagram app - awesome!

Cx

Friday, May 4, 2012

The playdate continues...


We made so many things on our playdate that I have at least 2 more posts of fun stuff to show you.

I am also working on some cards for the charity event that JT's Mother-in-Law is hosting. I have delivered a small batch, but I making many more - I'm working with 3 designs I think - 2 old favourites and a new one. I'll show you some pictures soon of those.

Today's main picture was an experiment, I've never embossed a patterned paper, I like the way it has come out. The colourful floral paper is from JT's Martha Stewart punch pad (DO WANT) and the chipboard butterfly is from a sheet with chipboard buttons on, that I dug out so JT and I could play with them. Below is a close-up shot - I like the texture the embossing added to the subtle pattern in the paper.


The pink card below isn't a firm favourite, it was based on a sketch and I like the idea, but now I am not convinced by the green strip! No matter, I am sure I'll find a use for it :)


The card below I love, really simple and very masculine I think. I used a really nice recollections card from Michaels' I bought these in Vegas in the sale bin - $1 for 10 cards! Bargain, you can't see but it has a slight shimmer. And no I didn't buy another scalloped punch, the small green punch was made using JT's punch (DO WANT). I can see myself making lots of these, might add these to the charity batch.


Last but not least by any means is this cheerful blue star embossed card. The corner star punch is JT's and the green felt star came from my stash. Love it, it's so fun.


So that's all for today. I am going to relax over the Bank Holiday, no partying for me, as I try and shift this cold. I'll be trying to blog too - got to get my posts back on track, following the April internet related hiatus!
Cx

Thursday, May 3, 2012

Basic human rights & Flamingoes!

Pink Flamingos
Apologies for my absence - due to a lack of internet in my home, which finally got sorted (by switching provider) earlier this week. I don't like to blog from work, that's proper abuse of work resources!! I can't explain how sad it's been not having the internet - it's a basic human right :)

So I still haven't found my engagement ring, but I am slightly happier as my Mother-in-Law has kindly gifted me her Aunty Adrienne's ring, which is beautiful and suits me and is a worthy replacement (temporary I hope).
There has been a lot going on in the Grantham world, we spent a lovely weekend with the Hopgoods and their 2 beautiful daughters Leila and Ana, we went out raving over Easter with Lemon (our wife), we had our first film club field trip (to the cinema), went out a lot with our friends and to top off a wonderful month we went to Jersey last weekend and stayed at Longueville Manor, which is too amazing for words! Unfortunately Hubby and I have both had (well I still have) rotten colds - I am hoping that mine doesn't mess with my plans this weekend!

The cards I have posted today are from the late March playdate I had with JT at my house. Playdate's are such fun, you get to gossip, work with someone, share your stash, it's great and even better when we remain sober-ish.

I love today's main picture - the Flamingo picture is one that I got out of an old book of illustrators. I really didn't have to do much - all I added were small glittery dots for the eyes and contrasting background papers and a sentiment from a set I made.

The card below is one that both JT and I really liked and felt that it could be used in different colourways to create really nice wedding invites.
I used a brocade style paper by Recollections from Michael's (from my Vegas haul), Spellbinders dies for the labels, the new Stampin' Up Bird builder punch (which I think JT might pinch), the sticky ribbon is from JT's collection and I stamped a greeting in black ink.


As the Bird builder punch was new, both JT and I tried it out a fair bit, the next card is fun and I think could be used for both men and women. The papers for the birds are from my oddments box, the green corrugated card which came from JT's stash and the sentiment was a gift from JT a while ago. I like the fact that this card is very bold and that the birds don't make it twee. I'll be trying this in different colours.


Last card for today is using the Stampin' Up Owl builder punch - I will be keeping this under lock and key, as JT has an owl thing..... I have just given this card to a friend at work for her birthday, as I felt the red and black were very her. The black textured brocade paper is from JT's stash - it's from a set her Sister gave her. I used JT's dotty embossing folder for the red strip and everything else is from my stash.

Using my new square punches was causing my head to hurt and then suddenly it came to me that they would be fun to use for kids cards - below are a couple of examples.

Squares and Aliens 
Squares and Aliens close-up
 I like the squares and alien paper by Bo Bunny, it makes a cool kids card. Below is a version for teenagers or adults - I always struggle to use the skull paper, but I think it works here.
Skulls and Squares
Skulls and Squares close-up
That's a pretty long post, but as I've been gone so long, I thought I'd try and bring you up to speed.

Cx